概述 滴滴出行公司的首个对外开源项目 - VirtualAPK。地址:https://github.com/didi/VirtualAPK
滴滴自行研发了这款插件化框架,功能全面、兼容性好,还能够适用于有耦合的业务插件,这就是VirtualAPK存在的意义。业内认为,在加载耦合插件方面,VirtualAPK可以说是开源方案的首选。据说滴滴打车里面已经用上了,所以还是有必要一探究竟的~~
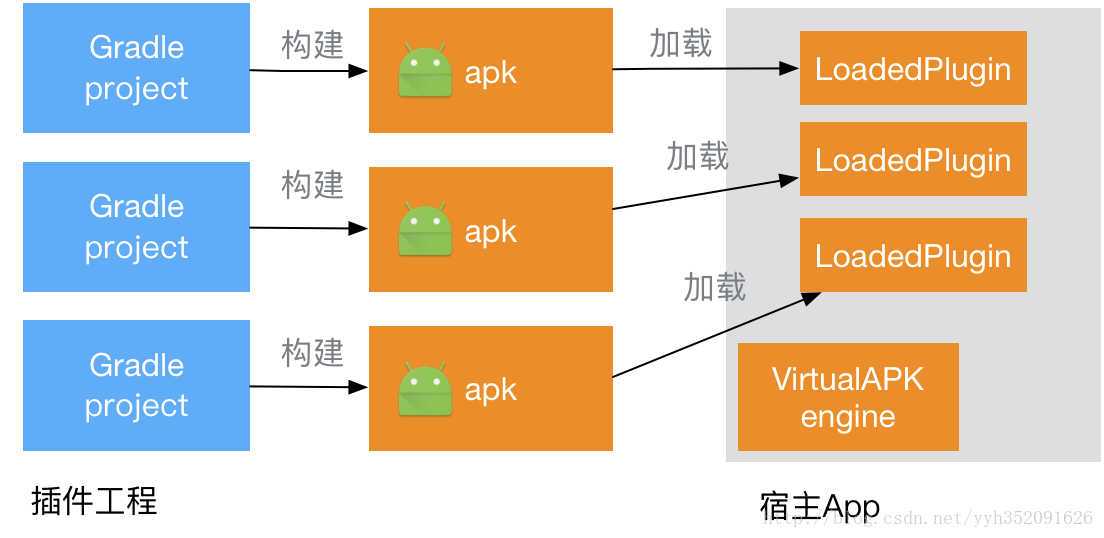
VirtualAPK 的工作流程如图所示:
VirtualAPK 对于插件没有额外的约束,原生的 apk 即可作为一个插件。插件工程编译生成 apk 后,通过宿主 App 加载,每个插件 apk 被加载后,都会在宿主中创建一个单独的 LoadedPlugin 对象。如上图所示,通过这些 LoadedPlugin 对象,VirtualAPK 就可以管理插件并赋予插件新的意义,使其可以像手机中安装过的App一样运行。
Activity 支持 Hook ActivityManagerService 插件化支持首先要解决的一点就是插件里的Activity并未在宿主程序的 AndroidMainfest.xml 注册,常规方法肯定无法直接启动插件的Activity,这个时候就需要去了解Activity的启动流程,关于启动过程主要的几个步骤请参考:浅析Android Activity的启动过程
从上文中可知,Activity 启动实际上是调用了 Instrumentation.execStartActivity 这个方法。源码如下:
1
2
3
4
5
6
7
8
9
10
11
12
13
14
15
16
17
18
19
20
21
22
23
24
25
26
27
28
29
30
public ActivityResult execStartActivity (Context who, IBinder contextThread, IBinder token, Activity target, Intent intent, int requestCode, Bundle options) { IApplicationThread whoThread = (IApplicationThread) contextThread; if (mActivityMonitors != null ) { synchronized (mSync) { final int N = mActivityMonitors.size(); for (int i=0 ; i<N; i++) { final ActivityMonitor am = mActivityMonitors.get(i); if (am.match(who, null , intent)) { am.mHits++; if (am.isBlocking()) { return requestCode >= 0 ? am.getResult() : null ; } break ; } } } } try { intent.migrateExtraStreamToClipData(); intent.prepareToLeaveProcess(); int result = ActivityManagerNative.getDefault().startActivity(whoThread, who.getBasePackageName(), intent, intent.resolveTypeIfNeeded(who.getContentResolver()),token, target != null ? target.mEmbeddedID : null , requestCode, 0 , null , options); checkStartActivityResult(result, intent); } catch (RemoteException e) { } return null ; }
可见, startActivity 最终通过 ActivityManagerNative.getDefault() 远程调用了AMS的startActivity方法, ActivityManagerNative 实际上就是 ActivityManagerService 这个远程对象的 Binder 代理对象,每次需要与AMS交互时,需要通过这个 Binder 对象完成远程IPC调用。
还不了解Binder的童鞋,可以看看老罗的Android进程间通信(IPC)机制Binder简要介绍和学习计划
1 2 3 4 5 6 7 8 9 10 11 12 13 14 15 16 17 18 19 20 21 22 23 24 25 26 27 28 29 30 31 32 33 34 35 36 37 38 39 40 41 42 43 44 45 46 47 48 49 50 51 52 53 54 55 56 57 58 59 60 61 62 63 64 65 66 67 68 static public IActivityManager getDefault () { return gDefault.get(); } private static final Singleton<iactivitymanager> gDefault = new Singleton <iactivitymanager>() { protected IActivityManager create () { IBinder b = ServiceManager.getService("activity" ); if (false ) { Log.v("ActivityManager" , "default service binder = " + b); } IActivityManager am = asInterface(b); if (false ) { Log.v("ActivityManager" , "default service = " + am); } return am; } }; 从这我们可以知道,ActivityManagerNative.getDefault() 实际上是返回了一个 IActivityManager 的单例对象。 那么,VirtualApk 所要做的第一件事,就是把这个 AMS 代理对象保存起来。首先,我们可以看一下 VirtualApk 核心库里面 com.didi.virtualapk.PluginManager 这个类的初始化: ```java private PluginManager (Context context) { Context app = context.getApplicationContext(); if (app == null ) { this .mContext = context; } else { this .mContext = ((Application)app).getBaseContext(); } prepare(); } private void prepare () { Systems.sHostContext = getHostContext(); this .hookInstrumentationAndHandler(); this .hookSystemServices(); } private void hookSystemServices () { try { Singleton<IActivityManager> defaultSingleton = (Singleton<IActivityManager>) ReflectUtil.getField(ActivityManagerNative.class, null , "gDefault" ); IActivityManager activityManagerProxy = ActivityManagerProxy.newInstance(this , defaultSingleton.get()); ReflectUtil.setField(defaultSingleton.getClass().getSuperclass(), defaultSingleton, "mInstance" , activityManagerProxy); if (defaultSingleton.get() == activityManagerProxy) { this .mActivityManager = activityManagerProxy; } } catch (Exception e) { e.printStackTrace(); } }
实际上除了 startActivity 是调用 AMS 的方法以外,startService, bindService 等方法,最终调用到AMS的里的方法,这个我们在动态代理类 com.didi.virtualapk.delegate.ActivityManagerProxy 也可以找到:
1
2
3
4
5
6
7
8
9
10
11
12
13
14
15
16
17
18
19
20
21
22
23
24
25
26
27
28
29
30
31
32
33
34
35
36
37
38
39
40
41
42
43
44
45
46
47
48
49
50
51
52
53
54
55
56
57
58
59
60
61
62
63
64
65
66
67
68
69
70
71
72
@Override public Object invoke (Object proxy, Method method, Object[] args) throws Throwable { if ("startService" .equals(method.getName())) { try { return startService(proxy, method, args); } catch (Throwable e) { Log.e(TAG, "Start service error" , e); } } else if ("stopService" .equals(method.getName())) { try { return stopService(proxy, method, args); } catch (Throwable e) { Log.e(TAG, "Stop Service error" , e); } } else if ("stopServiceToken" .equals(method.getName())) { try { return stopServiceToken(proxy, method, args); } catch (Throwable e) { Log.e(TAG, "Stop service token error" , e); } } else if ("bindService" .equals(method.getName())) { try { return bindService(proxy, method, args); } catch (Throwable e) { e.printStackTrace(); } } else if ("unbindService" .equals(method.getName())) { try { return unbindService(proxy, method, args); } catch (Throwable e) { e.printStackTrace(); } } else if ("getIntentSender" .equals(method.getName())) { try { getIntentSender(method, args); } catch (Exception e) { e.printStackTrace(); } } else if ("overridePendingTransition" .equals(method.getName())){ try { overridePendingTransition(method, args); } catch (Exception e){ e.printStackTrace(); } } try { return method.invoke(this .mActivityManager, args); } catch (Throwable th) { Throwable c = th.getCause(); if (c != null && c instanceof DeadObjectException) { IBinder ams = ServiceManager.getService(Context.ACTIVITY_SERVICE); if (ams != null ) { IActivityManager am = ActivityManagerNative.asInterface(ams); mActivityManager = am; } } Throwable cause = th; do { if (cause instanceof RemoteException) { throw cause; } } while ((cause = cause.getCause()) != null ); throw c != null ? c : th; } }
所以实际上就等同于我们重写了一些 Activity、Service 的相关操作。具体做些什么,后面会提到~
Hook Instrumentation 回过头去看看 Instrumentation.execStartActivity 这个方法,在最后有这么一句代码:
1 checkStartActivityResult(result, intent);
1
2
3
4
5
6
7
8
9
10
11
12
13
14
15
16
17
18
19
20
21
22
23
24
25
26
27
28
29
static void checkStartActivityResult (int res, Object intent) { if (res >= ActivityManager.START_SUCCESS) { return ; } switch (res) { case ActivityManager.START_INTENT_NOT_RESOLVED: case ActivityManager.START_CLASS_NOT_FOUND: if (intent instanceof Intent && ((Intent)intent).getComponent() != null ) throw new ActivityNotFoundException ( "Unable to find explicit activity class " + ((Intent)intent).getComponent().toShortString() + "; have you declared this activity in your AndroidManifest.xml?" ); throw new ActivityNotFoundException ( "No Activity found to handle " + intent); case ActivityManager.START_PERMISSION_DENIED: throw new SecurityException ("Not allowed to start activity " + intent); case ActivityManager.START_FORWARD_AND_REQUEST_CONFLICT: throw new AndroidRuntimeException ( "FORWARD_RESULT_FLAG used while also requesting a result" ); case ActivityManager.START_NOT_ACTIVITY: throw new IllegalArgumentException ( "PendingIntent is not an activity" ); default : throw new AndroidRuntimeException ("Unknown error code " + res + " when starting " + intent); } }
相信大家对上面的这些异常信息不陌生吧,其中最熟悉的非 Unable to find explicit activity class 莫属了,如果 Activity 没有在 AndroidMainfest.xml 注册,将会抛出此异常。
那么就得思考一个问题了,插件的 Activity 并未在宿主程序的 AndroidMainfest.xml 注册,要如何才能绕过这一层检测?
前文中提到,com.didi.virtualapk.PluginManager 这个类的初始化的时候,除了 Hook 出一个 AMS 代理对象以外,还 Hook 出一个 Instrumentation 对象。代码如下:
1
2
3
4
5
6
7
8
9
10
11
12
13
14
15
16
17
18
19
20
21
22
23
private void hookInstrumentationAndHandler () { try { Instrumentation baseInstrumentation = ReflectUtil.getInstrumentation(this .mContext); if (baseInstrumentation.getClass().getName().contains("lbe" )) { System.exit(0 ); } final VAInstrumentation instrumentation = new VAInstrumentation (this , baseInstrumentation); Object activityThread = ReflectUtil.getActivityThread(this .mContext); ReflectUtil.setInstrumentation(activityThread, instrumentation); ReflectUtil.setHandlerCallback(this .mContext, instrumentation); this .mInstrumentation = instrumentation; } catch (Exception e) { e.printStackTrace(); } }
既然 Activity 的启动,中间走了 Instrumentation.execStartActivity 这个方法,那么我们大概可以知道,Hook 出一个 Instrumentation 对象用来做什么了,实际上就是用来帮助启动插件的 Activity。
启动插件Activity 我们 Hook 了一个 VAInstrumentation 以替代系统的 Instrumentation,这样当系统通过 ActivityThread 调用 它的的成员变量 mInstrumentation 的 newActivity() 等方法的时候,实际是调用我们 VAInstrumentation 的 newActivity()。
实际上对于插件 Activity 启动,采用的是宿主 manifest 中占坑的方式来绕过系统校验,然后再加载真正的activity。
什么是占坑?就是构造一系列假的 Activity 替身,在 AndroidMainfest.xml 里面进行注册,以绕过检测,然后到了真正启动 Activity 的时候,再把它变回,去启动真正的目标 Activity。那么这一步是怎么做的呢?
我们可以打开核心库里面的 AndroidMainfest.xml 看看:
1 2 3 4 5 6 7 8 9 10 11 12 13 14 15 16 17 18 19 20 21 22 23 24 25 26 27 28 29 30 31 32 33 34 35 36 37 <application > <activity android:name =".A$1" android:launchMode ="standard" /> <activity android:name =".A$2" android:launchMode ="standard" android:theme ="@android:style/Theme.Translucent" /> <activity android:name =".B$1" android:launchMode ="singleTop" /> <activity android:name =".B$2" android:launchMode ="singleTop" /> <activity android:name =".B$3" android:launchMode ="singleTop" /> <activity android:name =".B$4" android:launchMode ="singleTop" /> <activity android:name =".B$5" android:launchMode ="singleTop" /> <activity android:name =".B$6" android:launchMode ="singleTop" /> <activity android:name =".B$7" android:launchMode ="singleTop" /> <activity android:name =".B$8" android:launchMode ="singleTop" /> <activity android:name =".C$1" android:launchMode ="singleTask" /> <activity android:name =".C$2" android:launchMode ="singleTask" /> <activity android:name =".C$3" android:launchMode ="singleTask" /> <activity android:name =".C$4" android:launchMode ="singleTask" /> <activity android:name =".C$5" android:launchMode ="singleTask" /> <activity android:name =".C$6" android:launchMode ="singleTask" /> <activity android:name =".C$7" android:launchMode ="singleTask" /> <activity android:name =".C$8" android:launchMode ="singleTask" /> <activity android:name =".D$1" android:launchMode ="singleInstance" /> <activity android:name =".D$2" android:launchMode ="singleInstance" /> <activity android:name =".D$3" android:launchMode ="singleInstance" /> <activity android:name =".D$4" android:launchMode ="singleInstance" /> <activity android:name =".D$5" android:launchMode ="singleInstance" /> <activity android:name =".D$6" android:launchMode ="singleInstance" /> <activity android:name =".D$7" android:launchMode ="singleInstance" /> <activity android:name =".D$8" android:launchMode ="singleInstance" /> </application >
可以发现,在清单里面注册了一堆假的 StubActivity。 ABCD分别对应不同的启动模式,那么,我们启动插件的 Activity 的时候,是如何把它改为清单里面已注册的这些假的 Activity 名呢?
在 VAInstrumentation 里面,重写了 startActivity 的必经之路,就是 execStartActivity() 方法:
1
2
3
4
5
6
7
8
9
10
11
12
13
14
15
16
17
18
19
20
21
22
23
24
25
26
27
28
29
30
31
32
33
34
35
36
37
public ActivityResult execStartActivity ( Context who, IBinder contextThread, IBinder token, Activity target, Intent intent, int requestCode, Bundle options) { mPluginManager.getComponentsHandler().transformIntentToExplicitAsNeeded(intent); if (intent.getComponent() != null ) { Log.i(TAG, String.format("execStartActivity[%s : %s]" , intent.getComponent().getPackageName(), intent.getComponent().getClassName())); this .mPluginManager.getComponentsHandler().markIntentIfNeeded(intent); } ActivityResult result = realExecStartActivity(who, contextThread, token, target, intent, requestCode, options); return result; } private ActivityResult realExecStartActivity ( Context who, IBinder contextThread, IBinder token, Activity target, Intent intent, int requestCode, Bundle options) { ActivityResult result = null ; try { Class[] parameterTypes = {Context.class, IBinder.class, IBinder.class, Activity.class, Intent.class, int .class, Bundle.class}; result = (ActivityResult)ReflectUtil.invoke(Instrumentation.class, mBase, "execStartActivity" , parameterTypes, who, contextThread, token, target, intent, requestCode, options); } catch (Exception e) { e.printStackTrace(); } return result; }
那么,是如何替换 StubActivity 的呢? 跟进代码:
1
2
3
4
5
6
7
8
9
10
11
12
13
14
15
16
17
18
19
20
21
22
23
24
25
26
27
28
29
30
31
32
33
34
35
36
37
38
39
public void markIntentIfNeeded (Intent intent) { if (intent.getComponent() == null ) { return ; } String targetPackageName = intent.getComponent().getPackageName(); String targetClassName = intent.getComponent().getClassName(); if (!targetPackageName.equals(mContext.getPackageName()) && mPluginManager.getLoadedPlugin(targetPackageName) != null ) { intent.putExtra(Constants.KEY_IS_PLUGIN, true ); intent.putExtra(Constants.KEY_TARGET_PACKAGE, targetPackageName); intent.putExtra(Constants.KEY_TARGET_ACTIVITY, targetClassName); dispatchStubActivity(intent); } } private void dispatchStubActivity (Intent intent) { ComponentName component = intent.getComponent(); String targetClassName = intent.getComponent().getClassName(); LoadedPlugin loadedPlugin = mPluginManager.getLoadedPlugin(intent); ActivityInfo info = loadedPlugin.getActivityInfo(component); if (info == null ) { throw new RuntimeException ("can not find " + component); } int launchMode = info.launchMode; Resources.Theme themeObj = loadedPlugin.getResources().newTheme(); themeObj.applyStyle(info.theme, true ); String stubActivity = mStubActivityInfo.getStubActivity(targetClassName, launchMode, themeObj); Log.i(TAG, String.format("dispatchStubActivity,[%s -> %s]" , targetClassName, stubActivity)); intent.setClassName(mContext, stubActivity); }
继续跟进代码:
1
2
3
4
5
6
7
8
9
10
11
12
13
14
15
16
17
18
19
20
21
22
23
24
25
26
27
28
29
30
31
32
33
34
35
36
37
38
39
40
41
42
43
44
45
46
47
48
49
50
51
52
53
54
55
56
57
58
59
60
61
62
63
64
65
66
67
68
69
70
71
72
class StubActivityInfo { public static final int MAX_COUNT_STANDARD = 1 ; public static final int MAX_COUNT_SINGLETOP = 8 ; public static final int MAX_COUNT_SINGLETASK = 8 ; public static final int MAX_COUNT_SINGLEINSTANCE = 8 ; public static final String corePackage = "com.didi.virtualapk.core" ; public static final String STUB_ACTIVITY_STANDARD = "%s.A$%d" ; public static final String STUB_ACTIVITY_SINGLETOP = "%s.B$%d" ; public static final String STUB_ACTIVITY_SINGLETASK = "%s.C$%d" ; public static final String STUB_ACTIVITY_SINGLEINSTANCE = "%s.D$%d" ; public final int usedStandardStubActivity = 1 ; public int usedSingleTopStubActivity = 0 ; public int usedSingleTaskStubActivity = 0 ; public int usedSingleInstanceStubActivity = 0 ; private HashMap<String, String> mCachedStubActivity = new HashMap <>(); public String getStubActivity (String className, int launchMode, Theme theme) { String stubActivity= mCachedStubActivity.get(className); if (stubActivity != null ) { return stubActivity; } TypedArray array = theme.obtainStyledAttributes(new int []{ android.R.attr.windowIsTranslucent, android.R.attr.windowBackground }); boolean windowIsTranslucent = array.getBoolean(0 , false ); array.recycle(); if (Constants.DEBUG) { Log.d("StubActivityInfo" , "getStubActivity, is transparent theme ? " + windowIsTranslucent); } stubActivity = String.format(STUB_ACTIVITY_STANDARD, corePackage, usedStandardStubActivity); switch (launchMode) { case ActivityInfo.LAUNCH_MULTIPLE: { stubActivity = String.format(STUB_ACTIVITY_STANDARD, corePackage, usedStandardStubActivity); if (windowIsTranslucent) { stubActivity = String.format(STUB_ACTIVITY_STANDARD, corePackage, 2 ); } break ; } case ActivityInfo.LAUNCH_SINGLE_TOP: { usedSingleTopStubActivity = usedSingleTopStubActivity % MAX_COUNT_SINGLETOP + 1 ; stubActivity = String.format(STUB_ACTIVITY_SINGLETOP, corePackage, usedSingleTopStubActivity); break ; } case ActivityInfo.LAUNCH_SINGLE_TASK: { usedSingleTaskStubActivity = usedSingleTaskStubActivity % MAX_COUNT_SINGLETASK + 1 ; stubActivity = String.format(STUB_ACTIVITY_SINGLETASK, corePackage, usedSingleTaskStubActivity); break ; } case ActivityInfo.LAUNCH_SINGLE_INSTANCE: { usedSingleInstanceStubActivity = usedSingleInstanceStubActivity % MAX_COUNT_SINGLEINSTANCE + 1 ; stubActivity = String.format(STUB_ACTIVITY_SINGLEINSTANCE, corePackage, usedSingleInstanceStubActivity); break ; } default :break ; } mCachedStubActivity.put(className, stubActivity); return stubActivity; } }
到这一步,就基本清晰了。同样的,既然变为了 StubActivity,那么真正启动的时候还得变回来才行。来看一下重写后的 newActivity() 方法:
1
2
3
4
5
6
7
8
9
10
11
12
13
14
15
16
17
18
19
20
21
22
23
24
25
26
27
28
29
30
31
@Override public Activity newActivity (ClassLoader cl, String className, Intent intent) throws InstantiationException, IllegalAccessException, ClassNotFoundException { try { cl.loadClass(className); } catch (ClassNotFoundException e) { LoadedPlugin plugin = this .mPluginManager.getLoadedPlugin(intent); String targetClassName = PluginUtil.getTargetActivity(intent); Log.i(TAG, String.format("newActivity[%s : %s]" , className, targetClassName)); if (targetClassName != null ) { Activity activity = mBase.newActivity(plugin.getClassLoader(), targetClassName, intent); activity.setIntent(intent); try { ReflectUtil.setField(ContextThemeWrapper.class, activity, "mResources" , plugin.getResources()); } catch (Exception ignored) { } return activity; } } return mBase.newActivity(cl, className, intent); }
到这里,插件的 Activity 启动流程分析,就基本结束了。细节方面,没法一步到位,还需要大家边看源码边理解,这样才能看得更透彻。
Service 支持 对于 Service 的支持,采用动态代理AMS,拦截 Service 相关的请求,将其中转给Service Runtime去处理,Service Runtime会接管系统的所有操作。
对于我们动态代理AMS,在上一节 Activity支持 中已经介绍过了,那么,简单的来看一下 ActivityManagerProxy 是如何启动一个Service的。
在执行 startService 等方法的时候,AMS 代理对象会相应的来执行以下这些方法:
1
2
3
4
5
6
7
8
9
10
11
12
13
14
15
16
17
18
19
20
21
22
23
24
25
26
27
28
29
30
31
32
33
34
35
36
37
38
39
private Object startService (Object proxy, Method method, Object[] args) throws Throwable { IApplicationThread appThread = (IApplicationThread) args[0 ]; Intent target = (Intent) args[1 ]; ResolveInfo resolveInfo = this .mPluginManager.resolveService(target, 0 ); if (null == resolveInfo || null == resolveInfo.serviceInfo) { return method.invoke(this .mActivityManager, args); } return startDelegateServiceForTarget(target, resolveInfo.serviceInfo, null , RemoteService.EXTRA_COMMAND_START_SERVICE); } private ComponentName startDelegateServiceForTarget (Intent target, ServiceInfo serviceInfo, Bundle extras, int command) { Intent wrapperIntent = wrapperTargetIntent(target, serviceInfo, extras, command); return mPluginManager.getHostContext().startService(wrapperIntent); } private Intent wrapperTargetIntent (Intent target, ServiceInfo serviceInfo, Bundle extras, int command) { target.setComponent(new ComponentName (serviceInfo.packageName, serviceInfo.name)); String pluginLocation = mPluginManager.getLoadedPlugin(target.getComponent()).getLocation(); boolean local = PluginUtil.isLocalService(serviceInfo); Class<? extends Service > delegate = local ? LocalService.class : RemoteService.class; Intent intent = new Intent (); intent.setClass(mPluginManager.getHostContext(), delegate); intent.putExtra(RemoteService.EXTRA_TARGET, target); intent.putExtra(RemoteService.EXTRA_COMMAND, command); intent.putExtra(RemoteService.EXTRA_PLUGIN_LOCATION, pluginLocation); if (extras != null ) { intent.putExtras(extras); } return intent; }
实际上包括我们调用 stopService(),AMS 代理对象最后变换后的意图,同样也是上面代码的最后两个个方法 startDelegateServiceForTarget 和 wrapperTargetIntent(),只不过 command 不一样。
所以本质上 AMS 作为代理,不管你执行启动或者关闭插件里面的 Service,他都是调用 LocalService 或者 RemoteService 的 startService 方法,在 LocalService 或者 RemoteService 的 onStartCommand() 下,根据 command 进行相应的操作。那么我们来看一下 LocalService 的 onStartCommand() 方法:
1
2
3
4
5
6
7
8
9
10
11
12
13
14
15
16
17
18
19
20
21
22
23
24
25
26
27
28
29
30
31
32
33
34
35
36
37
38
39
40
41
42
43
44
45
46
47
48
49
50
51
52
53
54
55
56
57
58
59
60
61
62
63
64
65
66
67
68
69
70
71
72
73
74
75
76
77
78
79
80
81
82
83
84
85
86
87
88
89
90
91
92
93
94
95
96
97
98
99
100
101
102
103
104
105
106
107
@Override public int onStartCommand (Intent intent, int flags, int startId) { if (null == intent || !intent.hasExtra(EXTRA_TARGET) || !intent.hasExtra(EXTRA_COMMAND)) { return START_STICKY; } Intent target = intent.getParcelableExtra(EXTRA_TARGET); int command = intent.getIntExtra(EXTRA_COMMAND, 0 ); if (null == target || command <= 0 ) { return START_STICKY; } ComponentName component = target.getComponent(); LoadedPlugin plugin = mPluginManager.getLoadedPlugin(component); switch (command) { case EXTRA_COMMAND_START_SERVICE: { ActivityThread mainThread = (ActivityThread)ReflectUtil.getActivityThread(getBaseContext()); IApplicationThread appThread = mainThread.getApplicationThread(); Service service; if (this .mPluginManager.getComponentsHandler().isServiceAvailable(component)) { service = this .mPluginManager.getComponentsHandler().getService(component); } else { try { service = (Service) plugin.getClassLoader().loadClass(component.getClassName()).newInstance(); Application app = plugin.getApplication(); IBinder token = appThread.asBinder(); Method attach = service.getClass().getMethod("attach" , Context.class, ActivityThread.class, String.class, IBinder.class, Application.class, Object.class); IActivityManager am = mPluginManager.getActivityManager(); attach.invoke(service, plugin.getPluginContext(), mainThread, component.getClassName(), token, app, am); service.onCreate(); this .mPluginManager.getComponentsHandler().rememberService(component, service); } catch (Throwable t) { return START_STICKY; } } service.onStartCommand(target, 0 , this .mPluginManager.getComponentsHandler().getServiceCounter(service).getAndIncrement()); break ; } case EXTRA_COMMAND_BIND_SERVICE: { ActivityThread mainThread = (ActivityThread)ReflectUtil.getActivityThread(getBaseContext()); IApplicationThread appThread = mainThread.getApplicationThread(); Service service = null ; if (this .mPluginManager.getComponentsHandler().isServiceAvailable(component)) { service = this .mPluginManager.getComponentsHandler().getService(component); } else { try { service = (Service) plugin.getClassLoader().loadClass(component.getClassName()).newInstance(); Application app = plugin.getApplication(); IBinder token = appThread.asBinder(); Method attach = service.getClass().getMethod("attach" , Context.class, ActivityThread.class, String.class, IBinder.class, Application.class, Object.class); IActivityManager am = mPluginManager.getActivityManager(); attach.invoke(service, plugin.getPluginContext(), mainThread, component.getClassName(), token, app, am); service.onCreate(); this .mPluginManager.getComponentsHandler().rememberService(component, service); } catch (Throwable t) { t.printStackTrace(); } } try { IBinder binder = service.onBind(target); IBinder serviceConnection = PluginUtil.getBinder(intent.getExtras(), "sc" ); IServiceConnection iServiceConnection = IServiceConnection.Stub.asInterface(serviceConnection); iServiceConnection.connected(component, binder); } catch (Exception e) { e.printStackTrace(); } break ; } case EXTRA_COMMAND_STOP_SERVICE: { Service service = this .mPluginManager.getComponentsHandler().forgetService(component); if (null != service) { try { service.onDestroy(); } catch (Exception e) { Log.e(TAG, "Unable to stop service " + service + ": " + e.toString()); } } else { Log.i(TAG, component + " not found" ); } break ; } case EXTRA_COMMAND_UNBIND_SERVICE: { Service service = this .mPluginManager.getComponentsHandler().forgetService(component); if (null != service) { try { service.onUnbind(target); service.onDestroy(); } catch (Exception e) { Log.e(TAG, "Unable to unbind service " + service + ": " + e.toString()); } } else { Log.i(TAG, component + " not found" ); } break ; } } return START_STICKY; }
很显然,在这里面才对应去控制了插件Service的生命周期。具体代码就留给大家分析吧~~
ContentProvider 支持 动态代理 IContentProvider,拦截provider相关的请求,将其中转给Provider Runtime去处理,Provider Runtime会接管系统的所有操作。
我们来看一下 com.didi.virtualapk.internal.PluginContentResolver 这个类:
1
2
3
4
5
6
7
8
9
10
11
12
13
14
15
16
17
18
19
20
21
22
23
24
25
26
27
28
29
30
31
32
33
34
35
36
37
38
39
40
41
42
43
44
45
46
public class PluginContentResolver extends ContentResolver { private ContentResolver mBase; private PluginManager mPluginManager; private static Method sAcquireProvider; private static Method sAcquireExistingProvider; private static Method sAcquireUnstableProvider; static { try { sAcquireProvider = ContentResolver.class.getDeclaredMethod("acquireProvider" , new Class []{Context.class, String.class}); sAcquireProvider.setAccessible(true ); sAcquireExistingProvider = ContentResolver.class.getDeclaredMethod("acquireExistingProvider" , new Class []{Context.class, String.class}); sAcquireExistingProvider.setAccessible(true ); sAcquireUnstableProvider = ContentResolver.class.getDeclaredMethod("acquireUnstableProvider" , new Class []{Context.class, String.class}); sAcquireUnstableProvider.setAccessible(true ); } catch (Exception e) { } } public PluginContentResolver (Context context) { super (context); mBase = context.getContentResolver(); mPluginManager = PluginManager.getInstance(context); } protected IContentProvider acquireProvider (Context context, String auth) { try { if (mPluginManager.resolveContentProvider(auth, 0 ) != null ) { return mPluginManager.getIContentProvider(); } return (IContentProvider) sAcquireProvider.invoke(mBase, context, auth); } catch (Exception e) { e.printStackTrace(); } return null ; } }
这个类是在构造 LoadedPlugin 的时候创建的 PluginContext 对象里面的 getContentResolver() 里面创建的。
1
2
3
4
5
6
7
8
9
10
11
12
13
14
15
class PluginContext extends ContextWrapper { private final LoadedPlugin mPlugin; public PluginContext (LoadedPlugin plugin) { super (plugin.getPluginManager().getHostContext()); this .mPlugin = plugin; } @Override public ContentResolver getContentResolver () { return new PluginContentResolver (getHostContext()); } }
那么,上面Hook 的 IContentProvider 代理对象,实际上是在 PluginManager 做的。
1
2
3
4
5
6
7
8
9
10
11
12
13
14
15
16
17
18
19
20
21
22
23
24
25
26
27
28
29
30
31
32
33
34
35
36
37
38
39
private void hookIContentProviderAsNeeded () { Uri uri = Uri.parse(PluginContentResolver.getUri(mContext)); mContext.getContentResolver().call(uri, "wakeup" , null , null ); try { Field authority = null ; Field mProvider = null ; ActivityThread activityThread = (ActivityThread) ReflectUtil.getActivityThread(mContext); Map mProviderMap = (Map) ReflectUtil.getField(activityThread.getClass(), activityThread, "mProviderMap" ); Iterator iter = mProviderMap.entrySet().iterator(); while (iter.hasNext()) { Map.Entry entry = (Map.Entry) iter.next(); Object key = entry.getKey(); Object val = entry.getValue(); String auth; if (key instanceof String) { auth = (String) key; } else { if (authority == null ) { authority = key.getClass().getDeclaredField("authority" ); authority.setAccessible(true ); } auth = (String) authority.get(key); } if (auth.equals(PluginContentResolver.getAuthority(mContext))) { if (mProvider == null ) { mProvider = val.getClass().getDeclaredField("mProvider" ); mProvider.setAccessible(true ); } IContentProvider rawProvider = (IContentProvider) mProvider.get(val); IContentProvider proxy = IContentProviderProxy.newInstance(mContext, rawProvider); mIContentProvider = proxy; Log.d(TAG, "hookIContentProvider succeed : " + mIContentProvider); break ; } } } catch (Exception e) { e.printStackTrace(); } }
这一块的内容,最好根据滴滴提供的Demo,再来看,比较容易理解。
1
2
3
4
Uri bookUri = Uri.parse("content://com.ryg.chapter_2.book.provider/book" );ContentValues values = new ContentValues ();values.put("_id" , 6 ); values.put("name" , "程序设计的艺术" );
Receiver 支持 官方解释是将插件中静态注册的receiver重新注册一遍。在代码里貌似没找到相应的支持,Demo 里也没有,或许这部分还没完成吧??
小结 本文重点在于分析插件的 Activity 启动流程,其他包括主题、资源,并没有详细分析,因为说细了内容还是有点多了,主要是让大伙儿在阅读代码时,有个大致的方向。有疑问欢迎一起探讨哟~~
感谢阅读!