前言 官方开发文档:http://www.jetbrains.org/intellij/sdk/docs/welcome.html
首先需要开启 Plugin Devkit , IDEA 中默认带了 Plugin Devkit插件,但是没有开启。
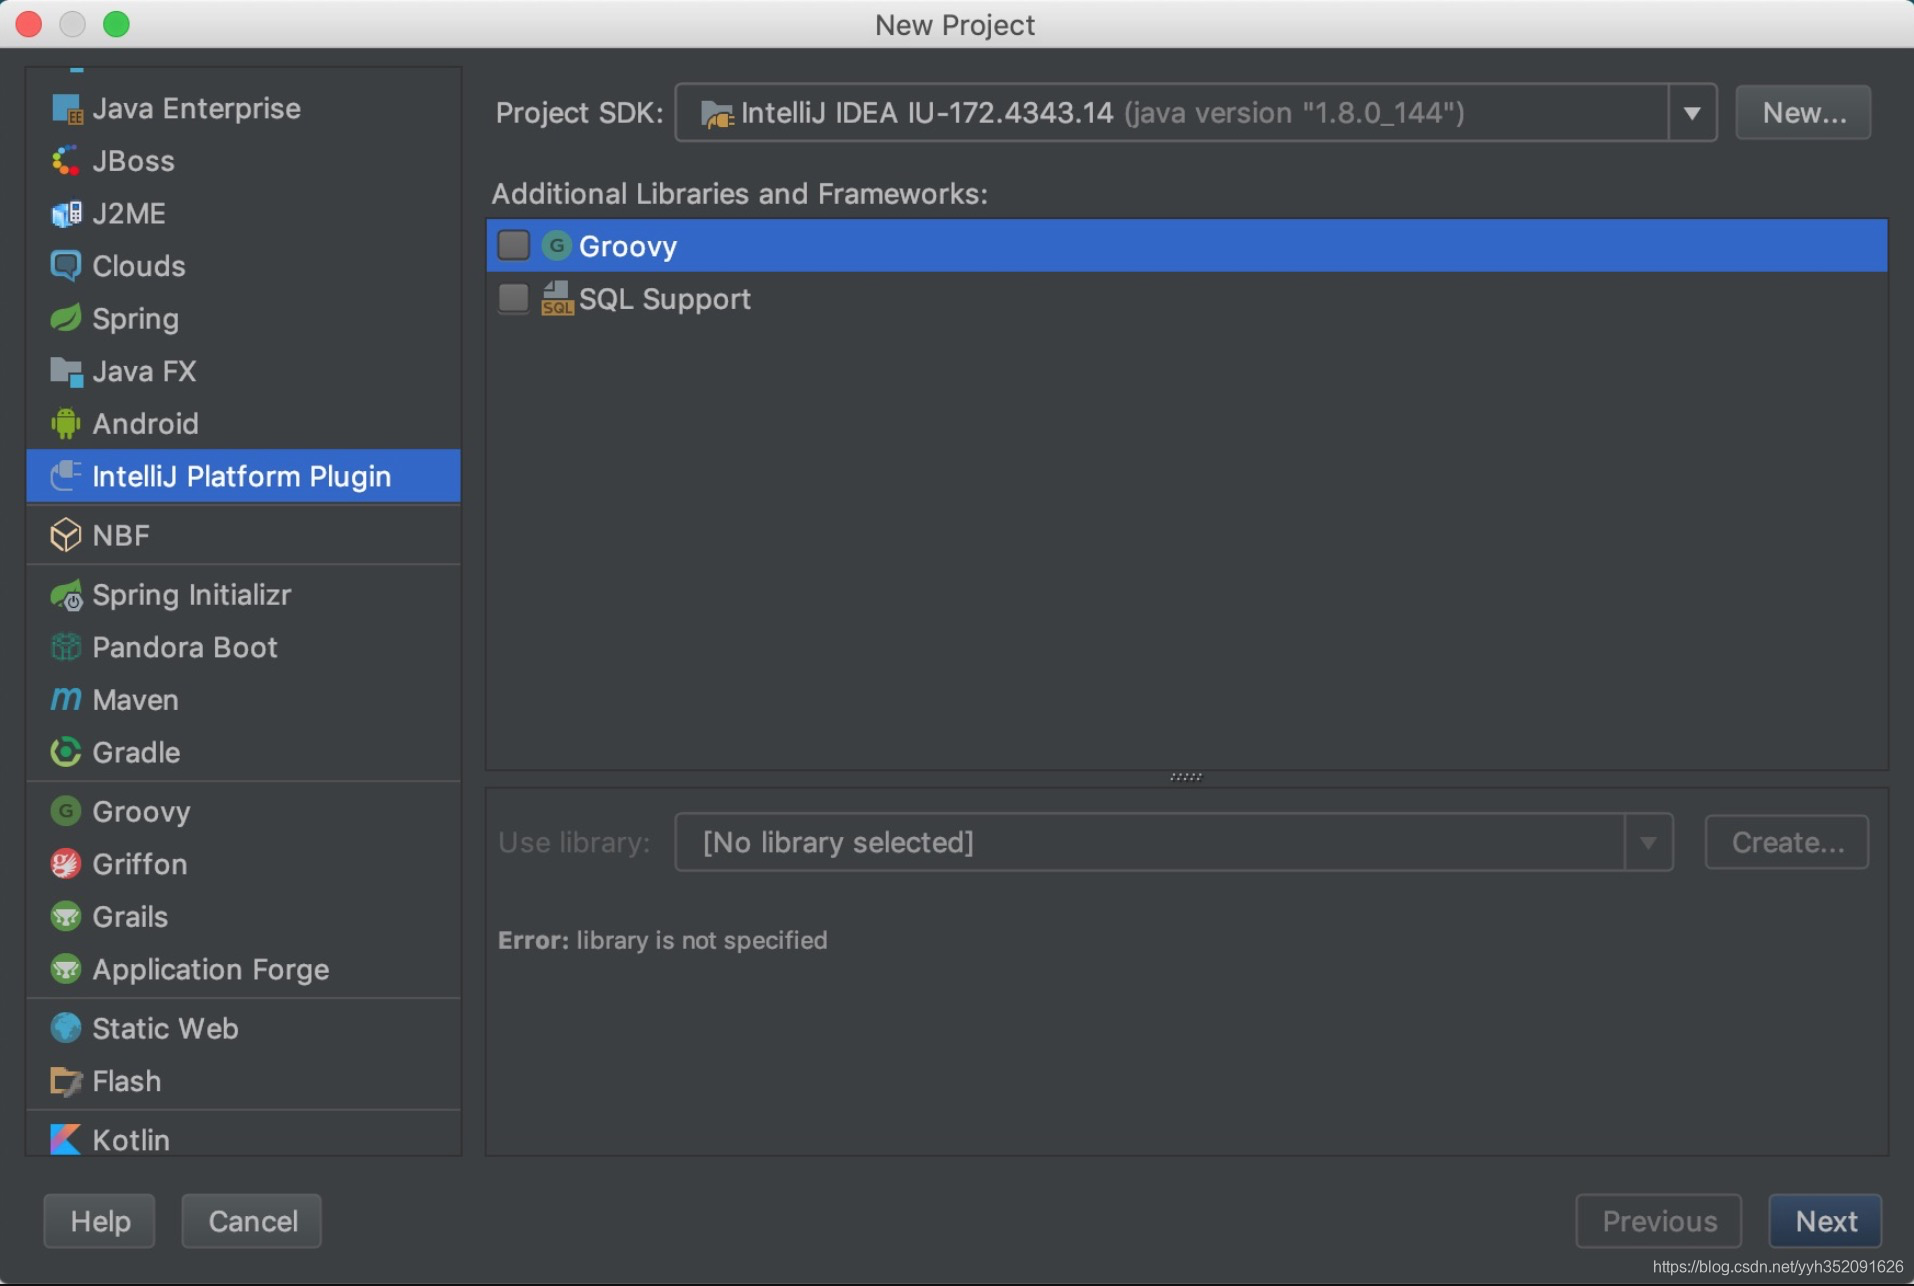
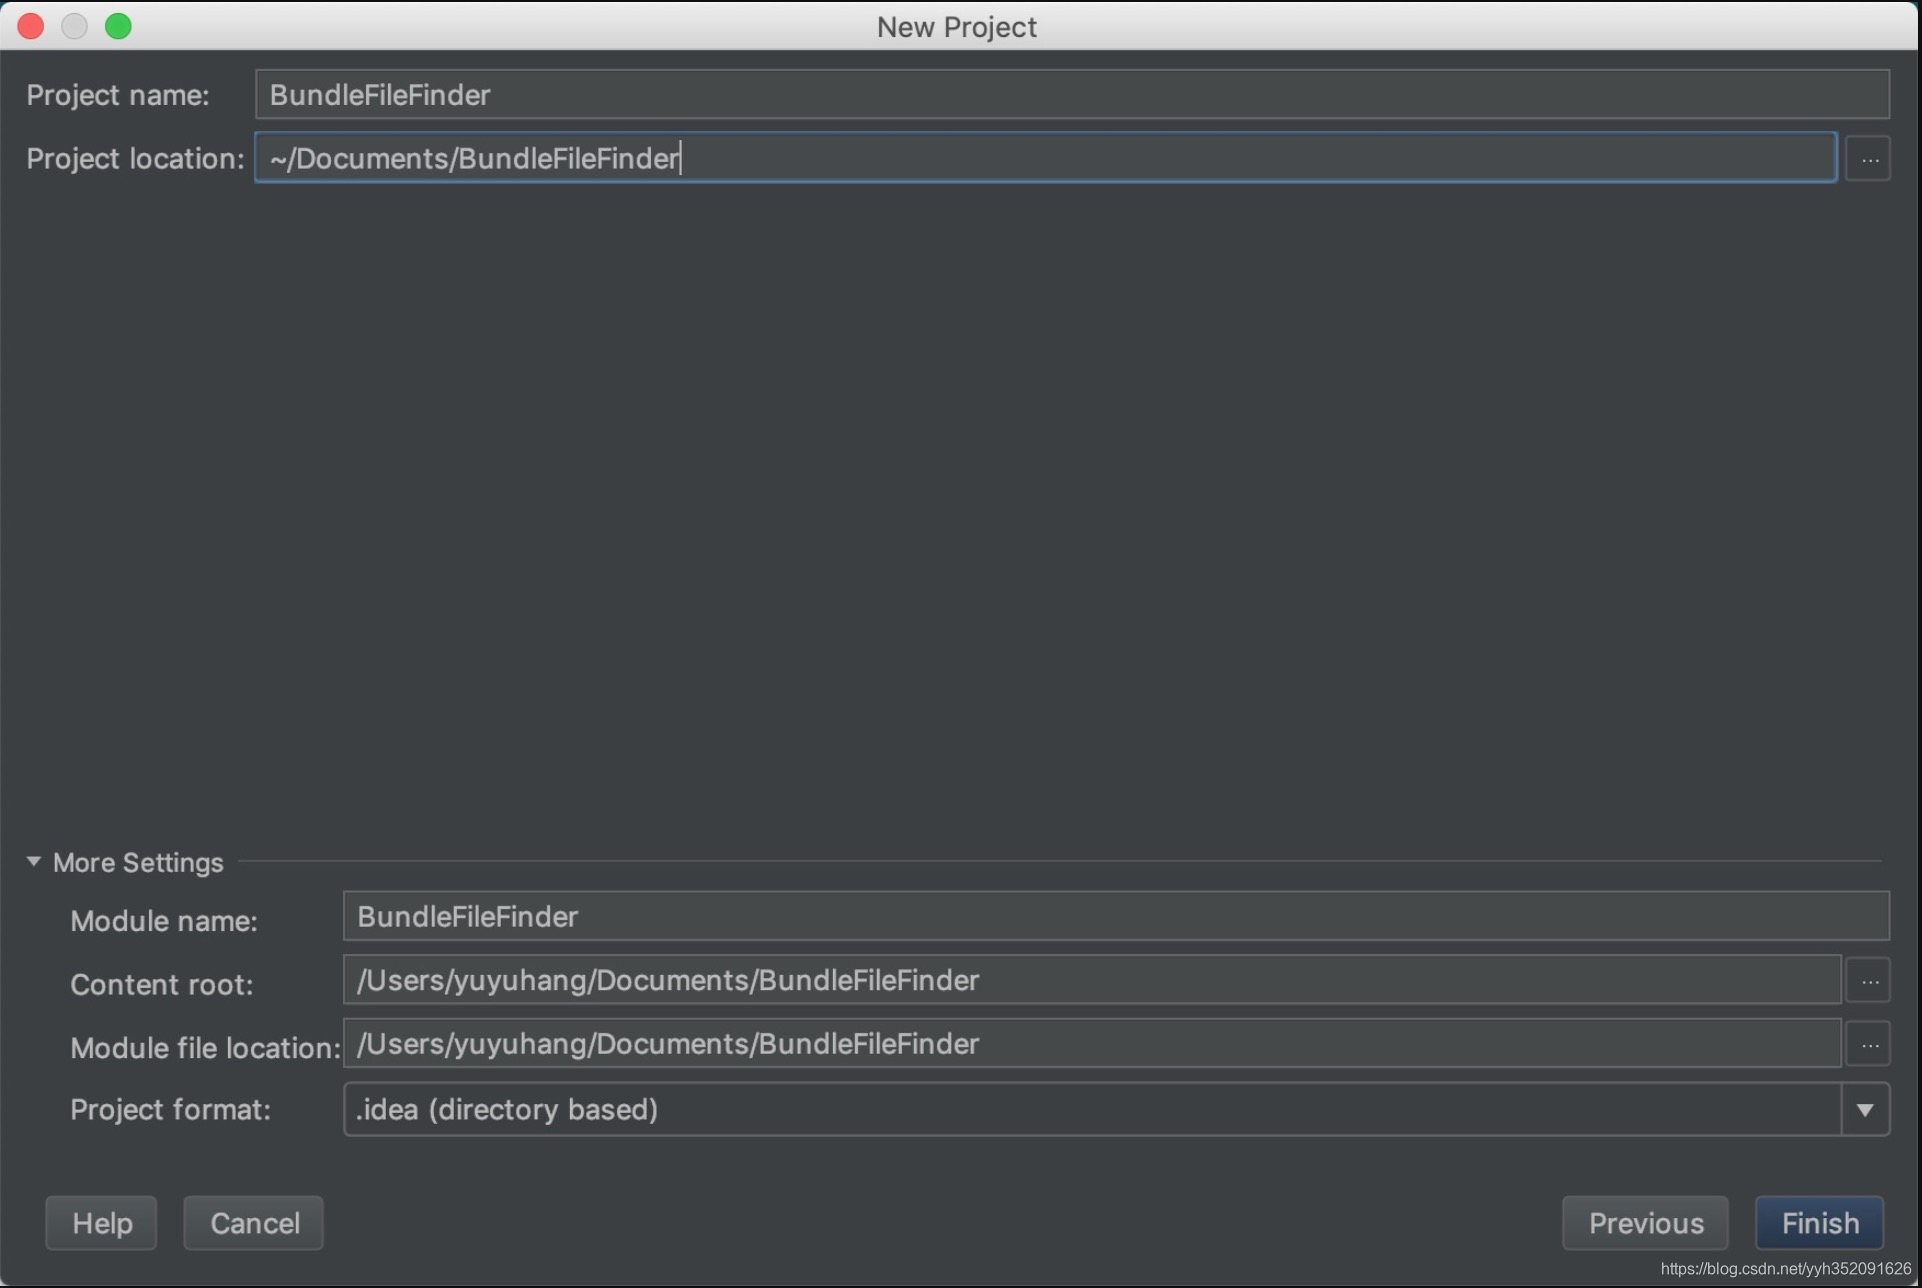
插件工程 创建
插件工程结构 1 2 3 4 5 6 7 8 BundleFileFinder/ resources/ META-INF/ plugin.xml ... src/ com.yuyang.finder ...
src 实现插件功能的classes
resources 存放工程需要用到的资源文件,例如一些引用的jar包、图片资源等。
META-INF/plugin.xml 插件的配置文件,指定插件名称、描述、版本号、支持的 IntelliJ IDEA 版本、插件的 components 和 actions 以及软件商等信息。
plugin.xml 1 2 3 4 5 6 7 8 9 10 11 12 13 14 15 16 17 18 19 20 21 22 23 24 25 26 27 28 29 30 31 32 33 34 35 36 37 38 39 40 <idea-plugin > <id > com.yuyang.finder</id > <name > BundleFileFinder</name > <version > 1.0</version > <vendor email ="smuyyh@gmail.com" url ="http://smuyyh.top" > $Company|$Name</vendor > <description > my plugin description</description > <change-notes > Initial release of the plugin.</change-notes > <depends > com.intellij.modules.all</depends > <idea-version since-build ="94.539" until-build ="192" /> <actions > <action id ="FinderAction" class ="com.yuyang.finder.FinderAction" text ="FileFinder" description ="FileFinder" > <add-to-group group-id ="ProjectViewPopupMenu" anchor ="first" /> </action > </actions > <extensionPoints > ... </extensionPoints > <extensions xmlns ="com.intellij" > ... </extensions > </idea-plugin >
Plugin Action Action 是什么 Action 用于描述一个动作、行为,可以通过快捷键、点选的方式进行触发。一个 Action 是一个 class,是 AnAction 的子类,actionPerformed 方法在菜单Item或者标题栏按钮被选中的时候会被调用。
Action 允许添加到右键菜单或者Toolbar菜单上面。Action也可以成组添加到具体的一个Group下面。
创建Action 1 2 3 4 5 6 7 8 9 10 11 12 13 14 15 16 17 18 19 20 21 22 23 24 25 26 27 28 29 30 31 32 public class FinderAction extends AnAction { private Project mProject; @Override public void actionPerformed (AnActionEvent event) { mProject = event.getData(PlatformDataKeys.PROJECT); DataContext dataContext = event.getDataContext(); if ("apk" .equals(getFileExtension(dataContext))) { VirtualFile file = DataKeys.VIRTUAL_FILE.getData(event.getDataContext()); if (file != null ) { } } else { Messages.showInfoMessage("请选择.apk文件" , "提示" ); } } @Override public void update (AnActionEvent event) { String extension = getFileExtension(event.getDataContext()); this .getTemplatePresentation().setEnabled(extension != null && "apk" .equals(extension)); } public String getFileExtension (DataContext dataContext) { VirtualFile file = DataKeys.VIRTUAL_FILE.getData(dataContext); return file == null ? null : file.getExtension(); } }
注册Action 1 2 3 4 5 6 7 8 9 10 11 12 13 14 15 16 17 18 19 20 21 22 23 24 25 26 27 28 29 30 31 32 33 34 35 36 37 38 39 40 41 42 <actions > <action id ="FinderAction" class ="com.yuyang.finder.FinderAction" text ="FileFinder" description ="当前插件菜单功能说明" icon ="icons/garbage.png" keymap ="未知" popup ="" project-type ="" use-shortcut-of ="" > <add-to-group group-id ="ProjectViewPopupMenu" anchor ="first" relative-to-action ="GenerateJavadoc" /> <keyboard-shortcut keymap ="Mac OS X" first-keystroke ="control alt G" second-keystroke ="C" remove ="true" /> </action > <group id ="FinderGroup" text ="组名" description ="描述" > <add-to-group group-id ="MainMenu" anchor ="last" /> <action id ="Action1" class ="com.yuyang.finder.FinderAction1" text ="名称1" description ="描述1" /> <separator /> <action id ="Action2" class ="com.yuyang.finder.FinderAction2" text ="名称2" description ="描述2" /> <reference ref ="EditorCopy" /> </group > </actions >
如果 anchor 设置为 before 或者 after,则必须设置 relative-to-action。
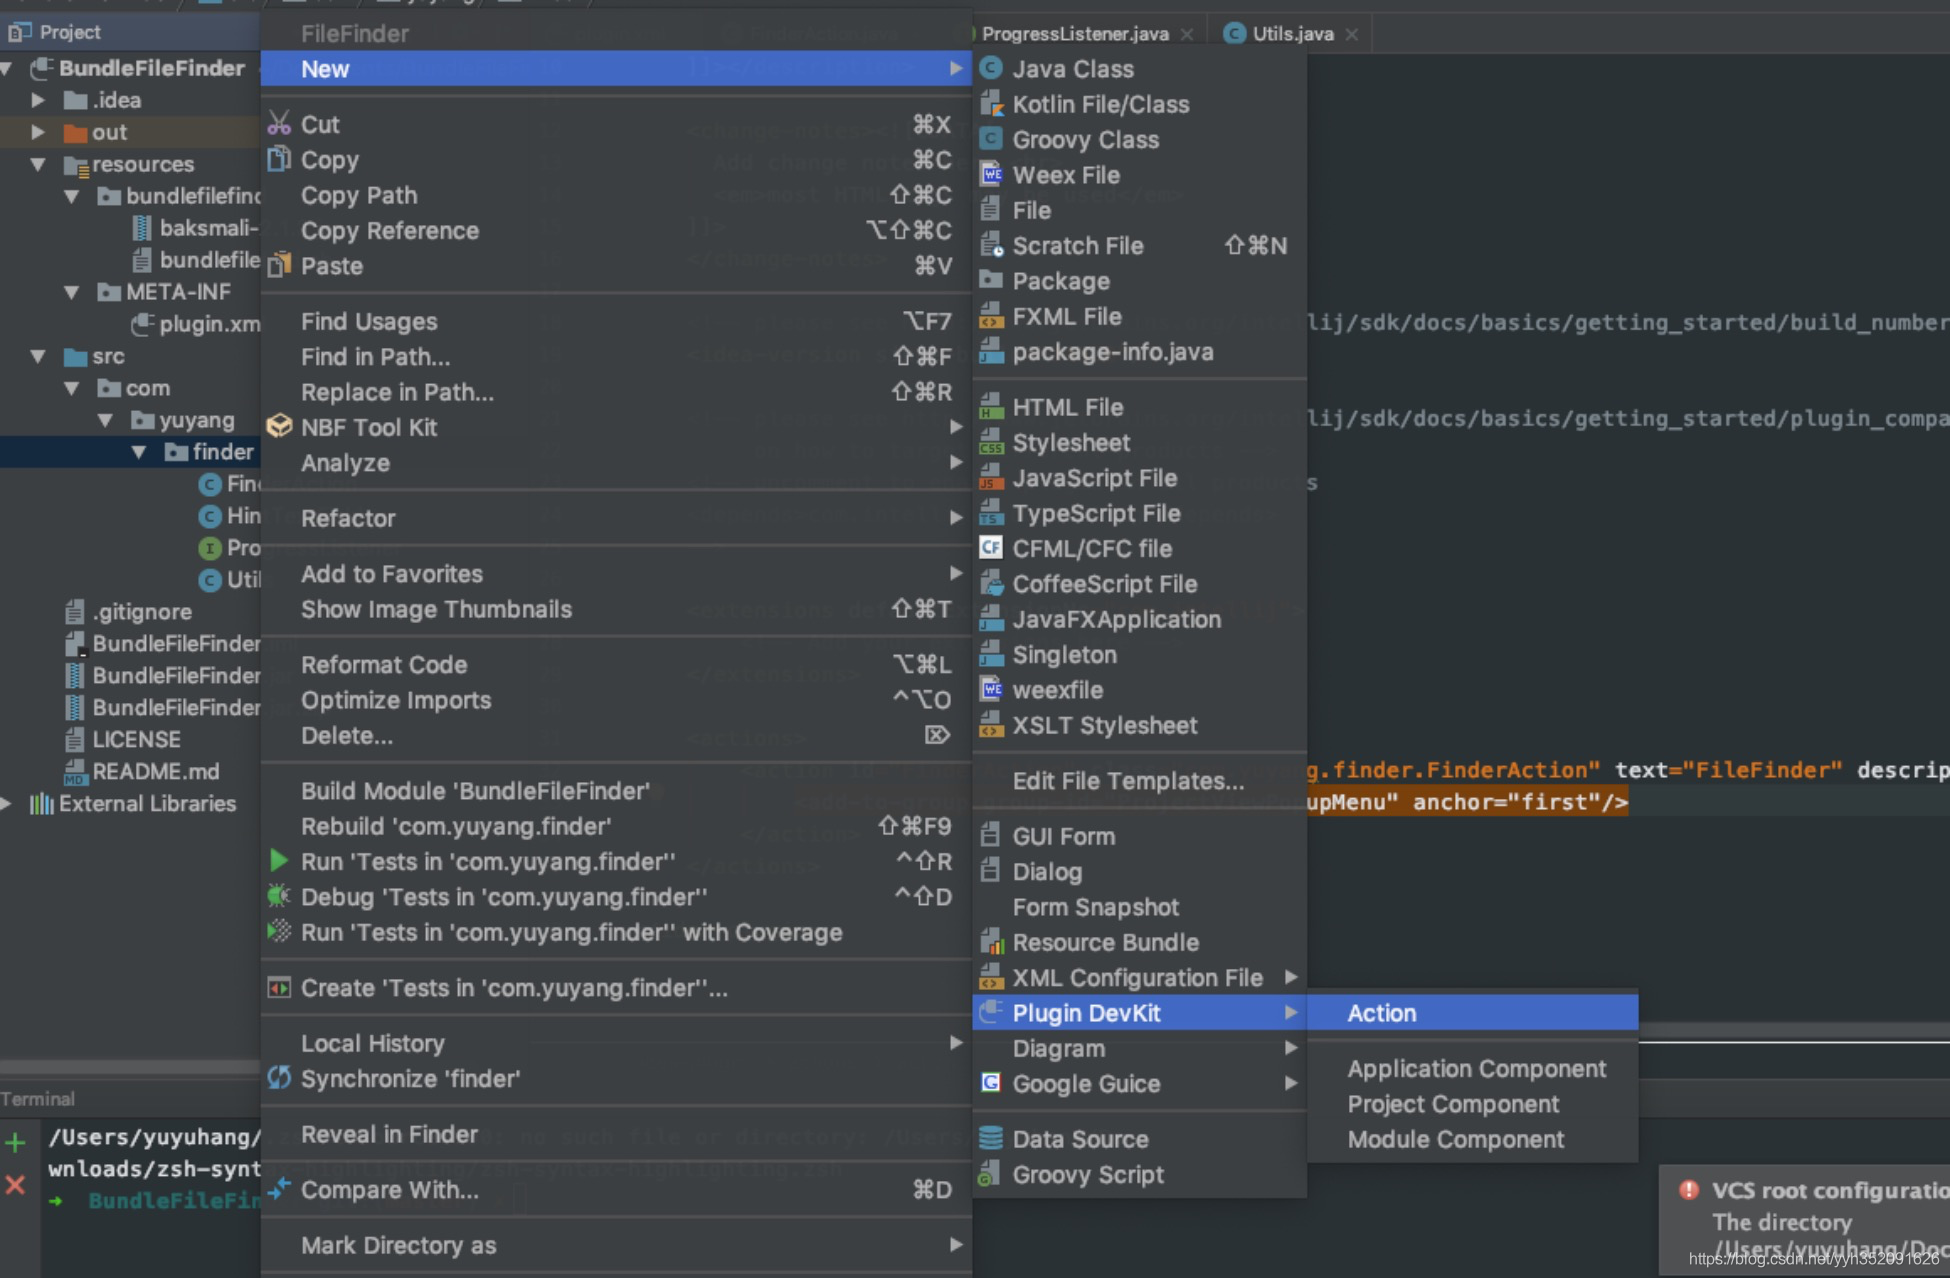
快速创建Action Plugin Devkit提供了快捷创建Action的方式。
信息填写基本遵循注册Action时的字段内容。
Action ID: action 唯一 id,推荐使用全类名
Class Name: 要被创建的 action class 名称
Name: menu item 的文本
Description: action 描述,toolbar 上按钮的提示文本,可选
Add to Group:选择新 action 要被添加到的 action group(Groups, Actions)以及相对其他 actions 的位置(Anchor),比如 EditMenu 就是顶部菜单栏的 Edit 菜单。
Keyboard Shortcuts:指定 action 的第一和第二快捷键
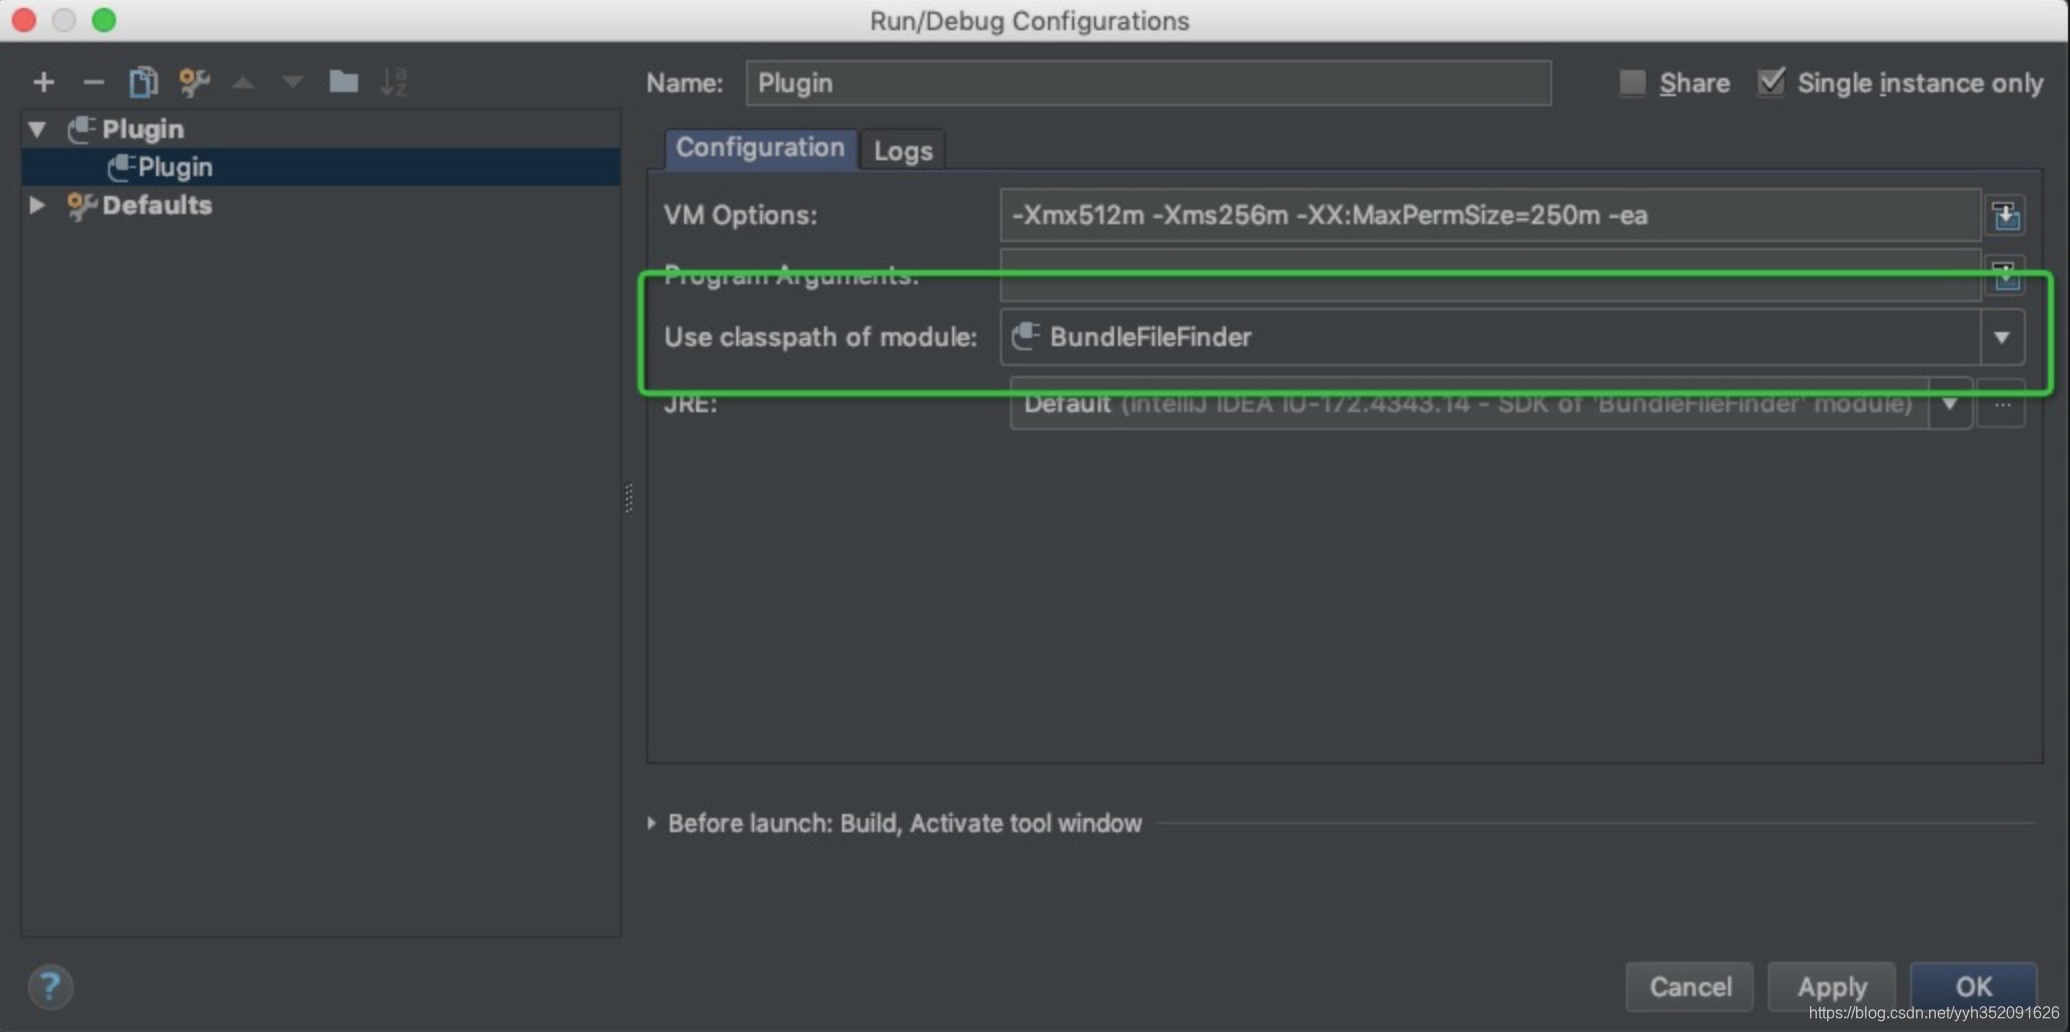
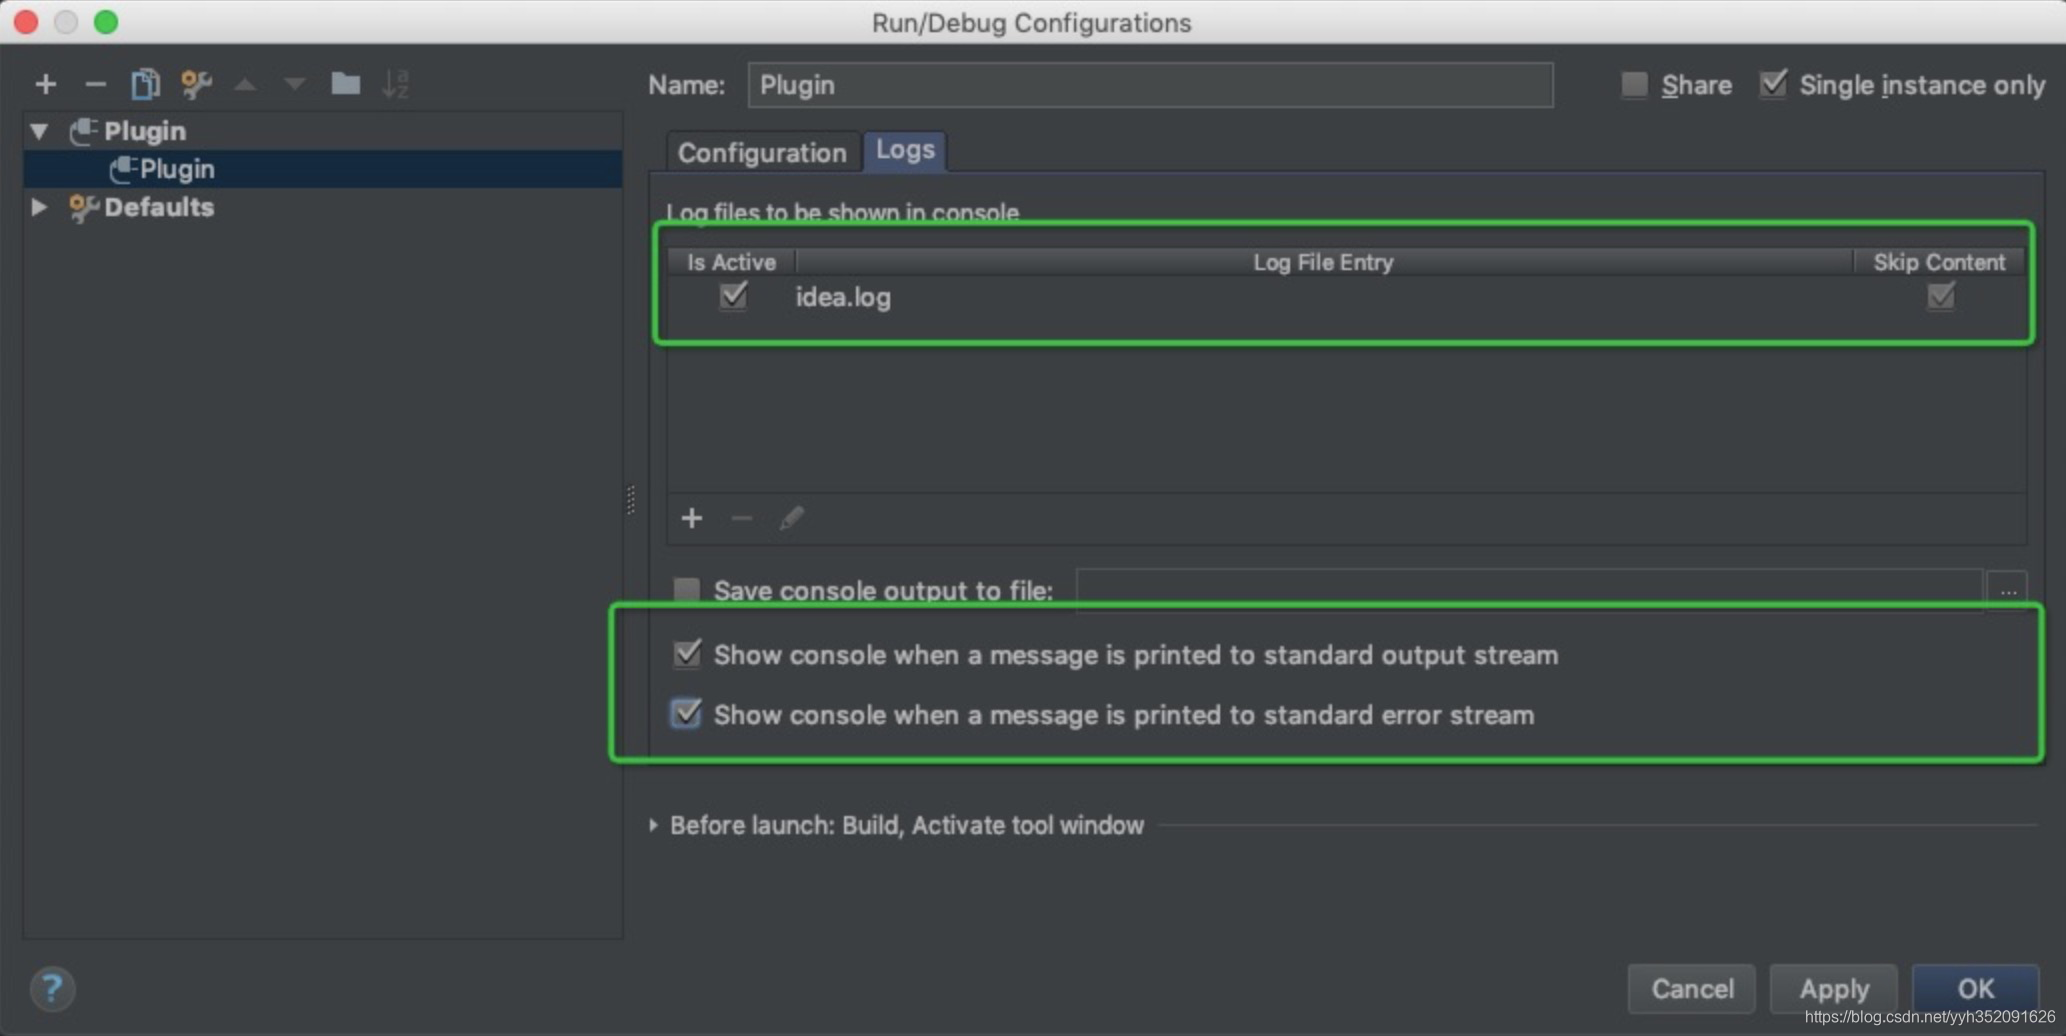
运行插件 点击 Run | Edit Configurations,若无配置项,则新建一个,配置一下 Use classpath of module,选择要调试的Module。
若需要查看调试日志,则需要勾选 Logs的选项。运行插件时将会输出log到console,也可以设置输出到具体文件。
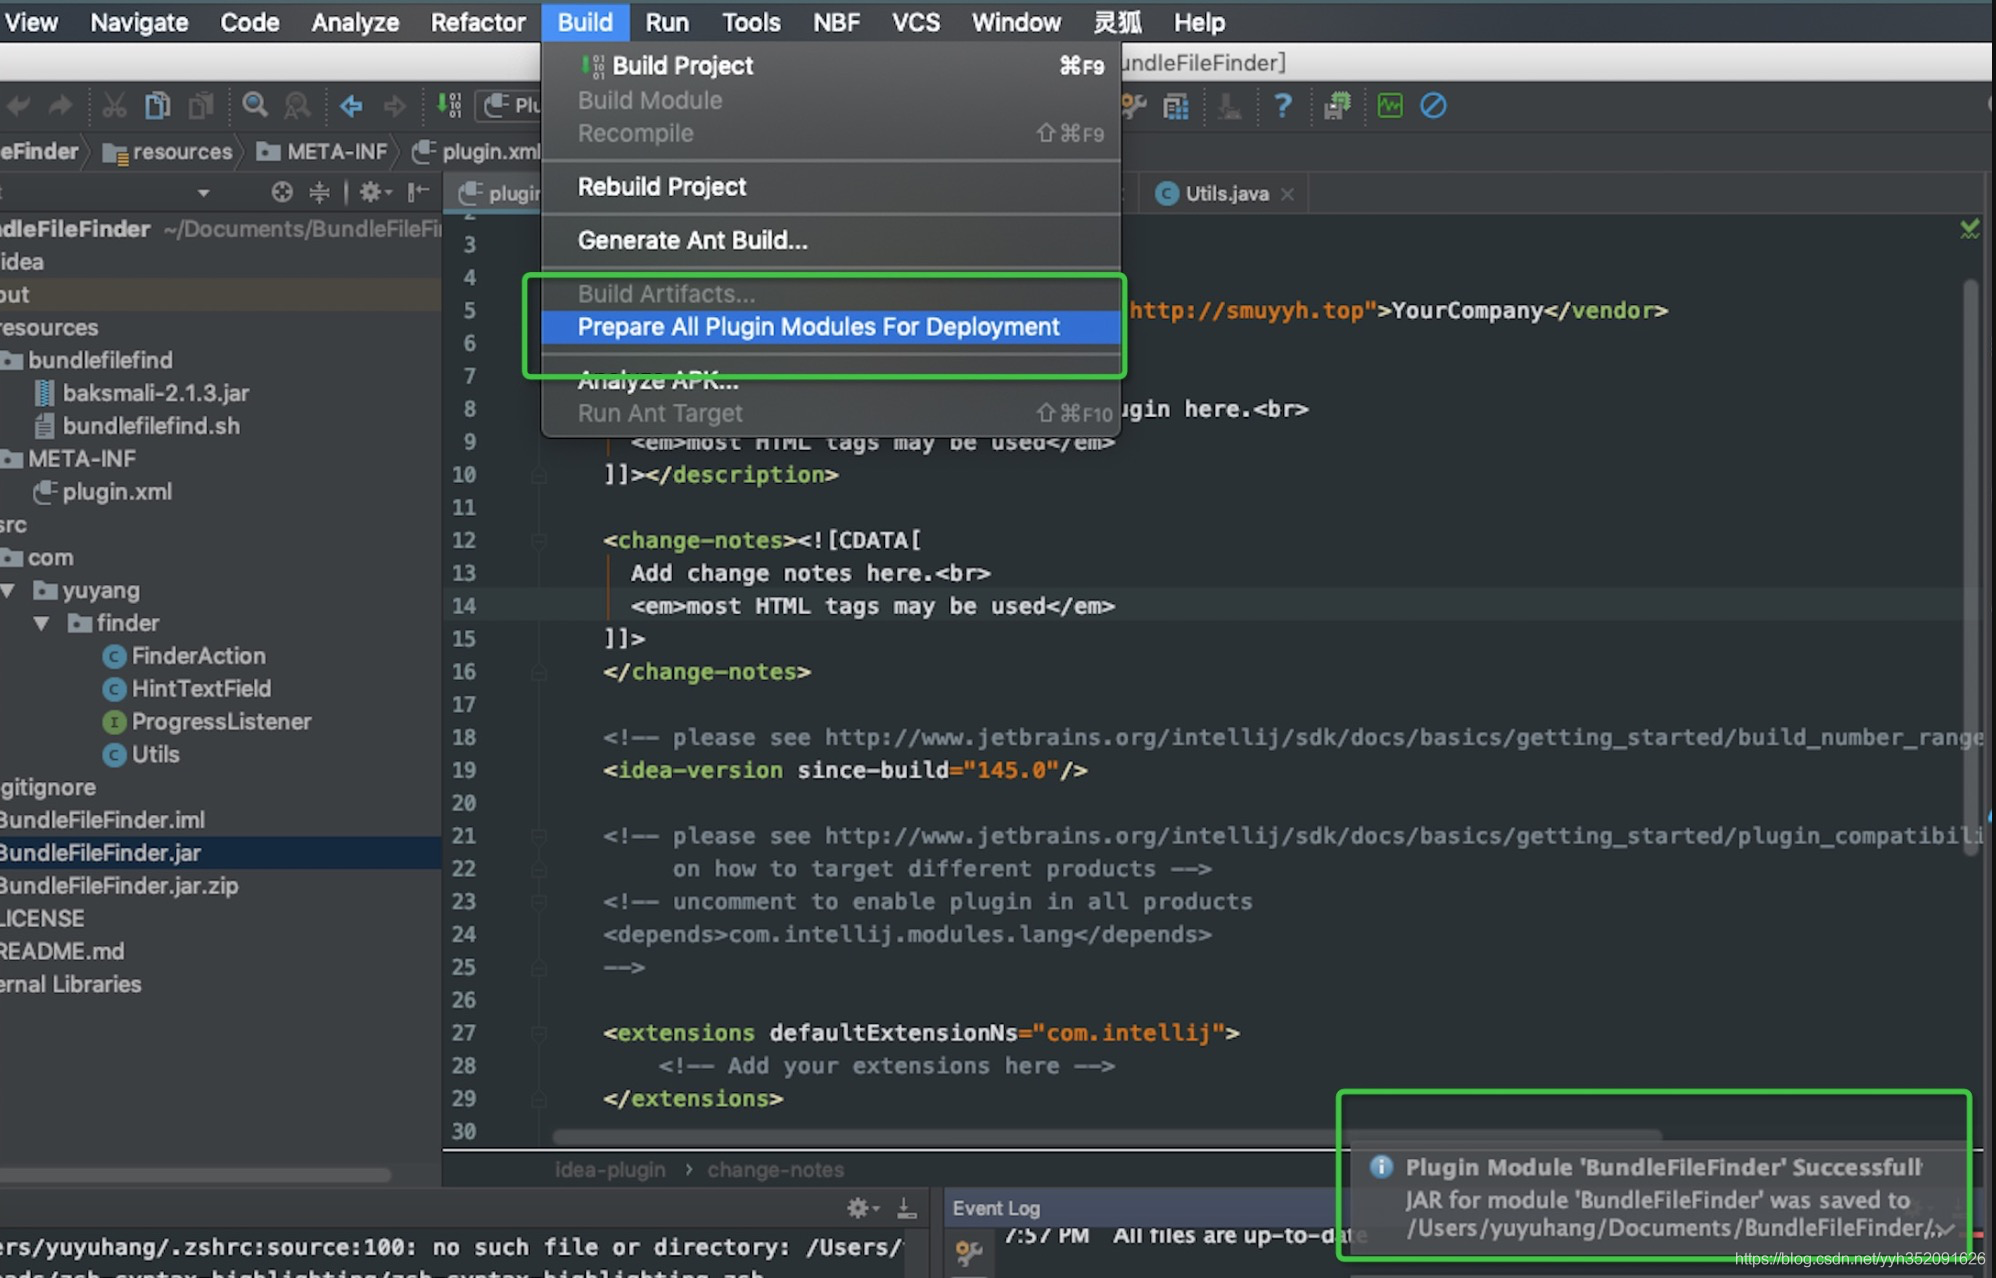
打包插件 Build -> Prepare All Plugin Modules For Deployment,一般会将插件输出到工程根目录底下。
如果该插件没有依赖其他的library,则插件会被打包成.jar,否则会被打包成.zip
1 2 3 4 5 6 7 8 9 10 11 12 13 14 15 16 17 .jar 类型的文件内容结构 BundleFileFinder.jar/ com/yuyang/finder/ ... META-INF/ plugin.xml .zip 类型的文件内容结构 BundleFileFinder.zip/ lib/ lib1.jar lib2.jar BundleFileFinder.jar/ com/yuyang/finder/ ... META-INF/ plugin.xml
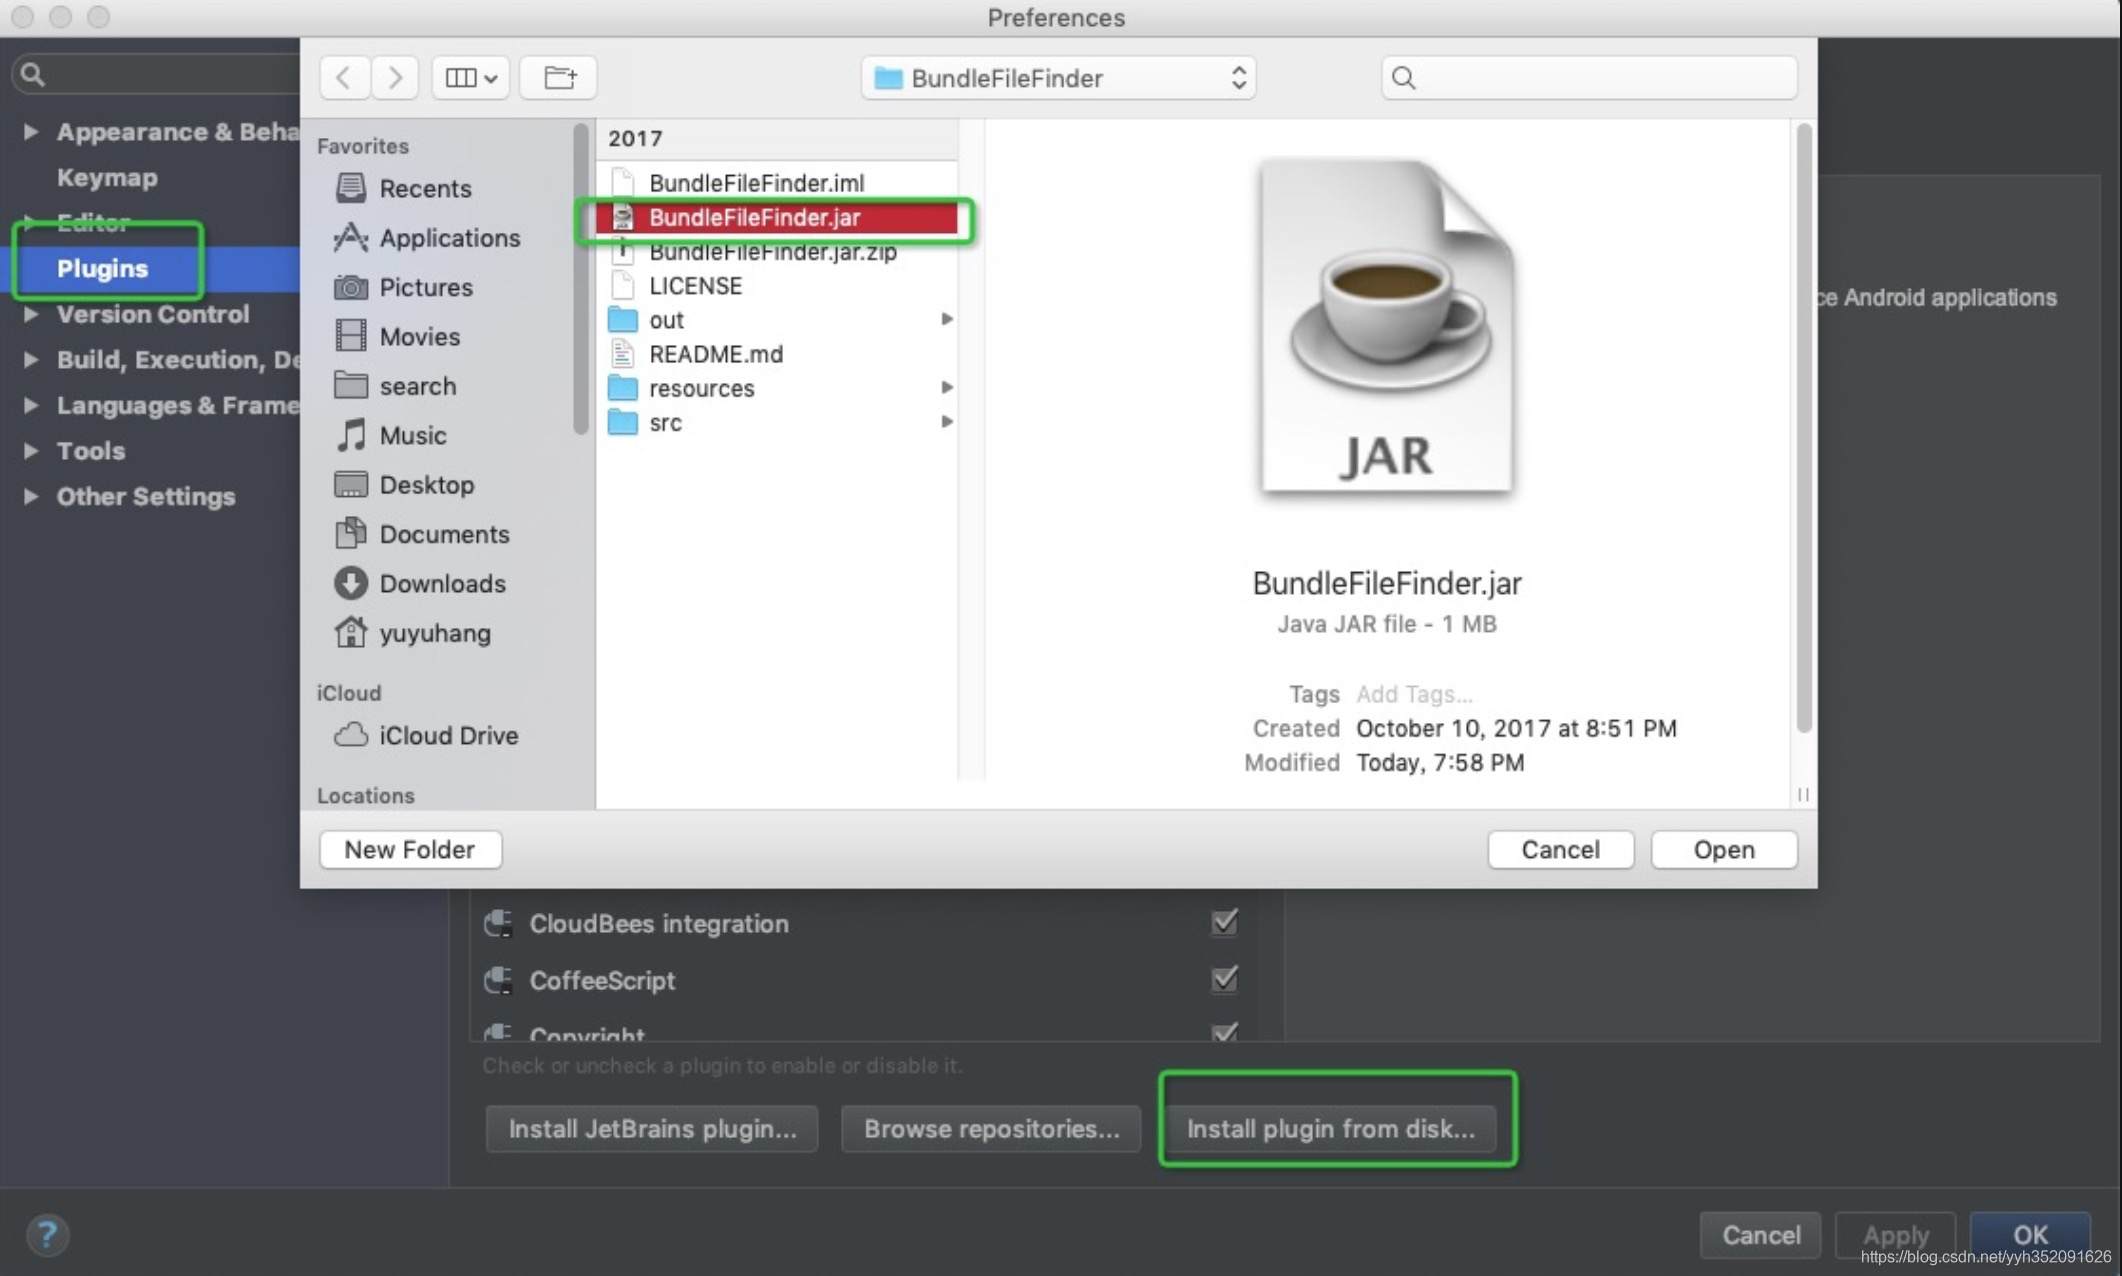
安装插件 Intellij IDEA -> Preferences -> Plugins -> Install Plugin From Disk,选择打包出来的 .jar 或者 .zip 文件。
Plugin Components Components 类型
Components 接口类型
描述
Application Component
IDEA启动时会初始化,IDEA生命周期中仅存在一个实例。
Project Component
IDEA 会为每一个 Project 实例创建一个 Project 级别的component
Module Component
IDEA 会为每一个 Project 的加载过的Module实例Module级别的component
创建 Component 与 Action 一样,可以通过快捷方式创建。 右击菜单 -> New -> Plugin Devkit -> Application/Project/Module Component。
例如创建 Application Component,默认会生成一个 Application 类 和 plugin.xml 的配置
1 2 3 4 5 6 7 8 9 10 11 12 13 14 15 16 17 18 19 20 public class FinderApplication implements ApplicationComponent { public FinderApplication () { } @Override public void initComponent () { } @Override public void disposeComponent () { } @Override @NotNull public String getComponentName () { return "FinderApplication" ; } }
1 2 3 4 5 <application-components > <component > <implementation-class > com.yuyang.finder.FinderApplication</implementation-class > </component > </application-components >
Project Component
1 2 3 4 5 6 7 8 9 10 11 12 13 14 15 16 17 18 19 20 21 22 23 24 25 26 27 28 29 30 public class FinderProject implements ProjectComponent { public FinderProject (Project project) { } @Override public void initComponent () { } @Override public void disposeComponent () { } @Override @NotNull public String getComponentName () { return "FinderProject" ; } @Override public void projectOpened () { } @Override public void projectClosed () { } }
1 2 3 4 5 <project-components > <component > <implementation-class > com.yuyang.finder.FinderProject</implementation-class > </component > </project-components >
Module Component
1 2 3 4 5 6 7 8 9 10 11 12 13 14 15 16 17 18 19 20 21 22 23 24 25 26 public class FinderModule implements ModuleComponent { public FinderModule (Module module ) { } @Override public void initComponent () { } @Override public void disposeComponent () { } @Override @NotNull public String getComponentName () { return "FinderModule" ; } @Override public void moduleAdded () { } }
1 2 3 4 5 <module-components > <component > <implementation-class > com.yuyang.finder.FinderModule</implementation-class > </component > </module-components >
获取 Component 实例 例如 获取定义的一个 Application Component 实例:
1 2 FinderApplication finderApplication = ApplicationManager.getApplication().getComponent(FinderApplication.class);
Project 与 Module
1 2 3 4 5 6 7 8 9 10 11 12 13 public class FinderProject implements ProjectComponent { private Project project; public FinderProject (Project project) { this .project = project; } @Override public void initComponent () { FinderModule finderModule = project.getComponent(FinderModule.class); } }
也可以通过 AnAction 的事件获取。
1 2 3 4 5 6 7 8 9 10 11 12 13 14 15 16 17 18 19 20 public class FinderAction extends AnAction { private Application mApplication; private Project mProject; private Module mModule; @Override public void actionPerformed (AnActionEvent event) { DataContext dataContext = event.getDataContext(); mProject = (Project)dataContext.getData(DataConstants.PROJECT); mModule =(Module)dataContext.getData(DataConstants.MODULE); mProject = event.getData(PlatformDataKeys.PROJECT); } }
持久化 对于IDEA插件的一些配置,一般情况下都不会希望用户每次使用插件时都要配置一遍,所以 IntelliJ Platform 提供了一些 API,来做数据的持久化。
PropertiesComponent 对于简单的 key - value 数据结构,可以使用 PropertiesComponent,用于保存 application 和 project 级别的数据。用法如下:
1 2 3 4 5 6 7 8 PropertiesComponent propertiesComponent = PropertiesComponent.getInstance();PropertiesComponent propertiesComponent = PropertiesComponent.getInstance(Project);propertiesComponent.setValue(name, value) propertiesComponent.getValue(name)
所有的 PropertiesComponent设置的键值对共用同一个namespance,所以需要避免key冲突。
PersistentStateComponent 对于复杂的数据结构,可以使用 PersistentStateComponent,PersistentStateComponent 可以指定持久化的存储位置。
需要提供一个 PersistentStateComponent 的实现类,T代表需要持久化的数据结构类型,然后重写 getState() 和 loadState() 方法。T可以是任意的类,或者是实现类自身。
若需要指定存储位置,则在实现类上增加 @State 注解
若不希望其中的某个字段被持久化,可以在该字段上增加 @Transient 注解
1 2 3 4 5 6 7 8 9 10 11 12 13 14 15 16 17 18 19 20 21 22 23 24 25 26 27 @State(name = "PersistentStateComponentImpl", storages = { @Storage(value = "PersistentStateComponentImpl.xml") }) class PersistentStateComponentImpl implements PersistentStateComponent <State> { State myState; public State getState () { return myState; } public void loadState (State state) { myState = state; } } class State { public State () {} public String value; @Transient public String disableSave; }
若是 application 级别的组件
运行调试时 xml 文件的位置: ~/IdeaICxxxx/system/plugins-sandbox/config/options
正式安装时 xml 文件的位置: ~/IdeaICxxxx/config/options
若是 project 级别的组件
默认为项目的 .idea/misc.xml
若指定为 StoragePathMacros.WORKSPACE_FILE,则会被保存在 .idea/worksapce.xml
注册持久化组件 持久化组件可以声明为 Service,也可以声明为 Component,声明为 Component 则与前面介绍注册与获取的方法一致,声明为Service如下:
1 2 3 4 5 6 <extensions defaultExtensionNs ="com.intellij" > <applicationService serviceImplementation ="com.yuyh.finder.PersistentStateComponentImpl1" /> <projectService serviceImplementation ="com.yuyh.finder.PersistentStateComponentImpl2" /> </extensions >
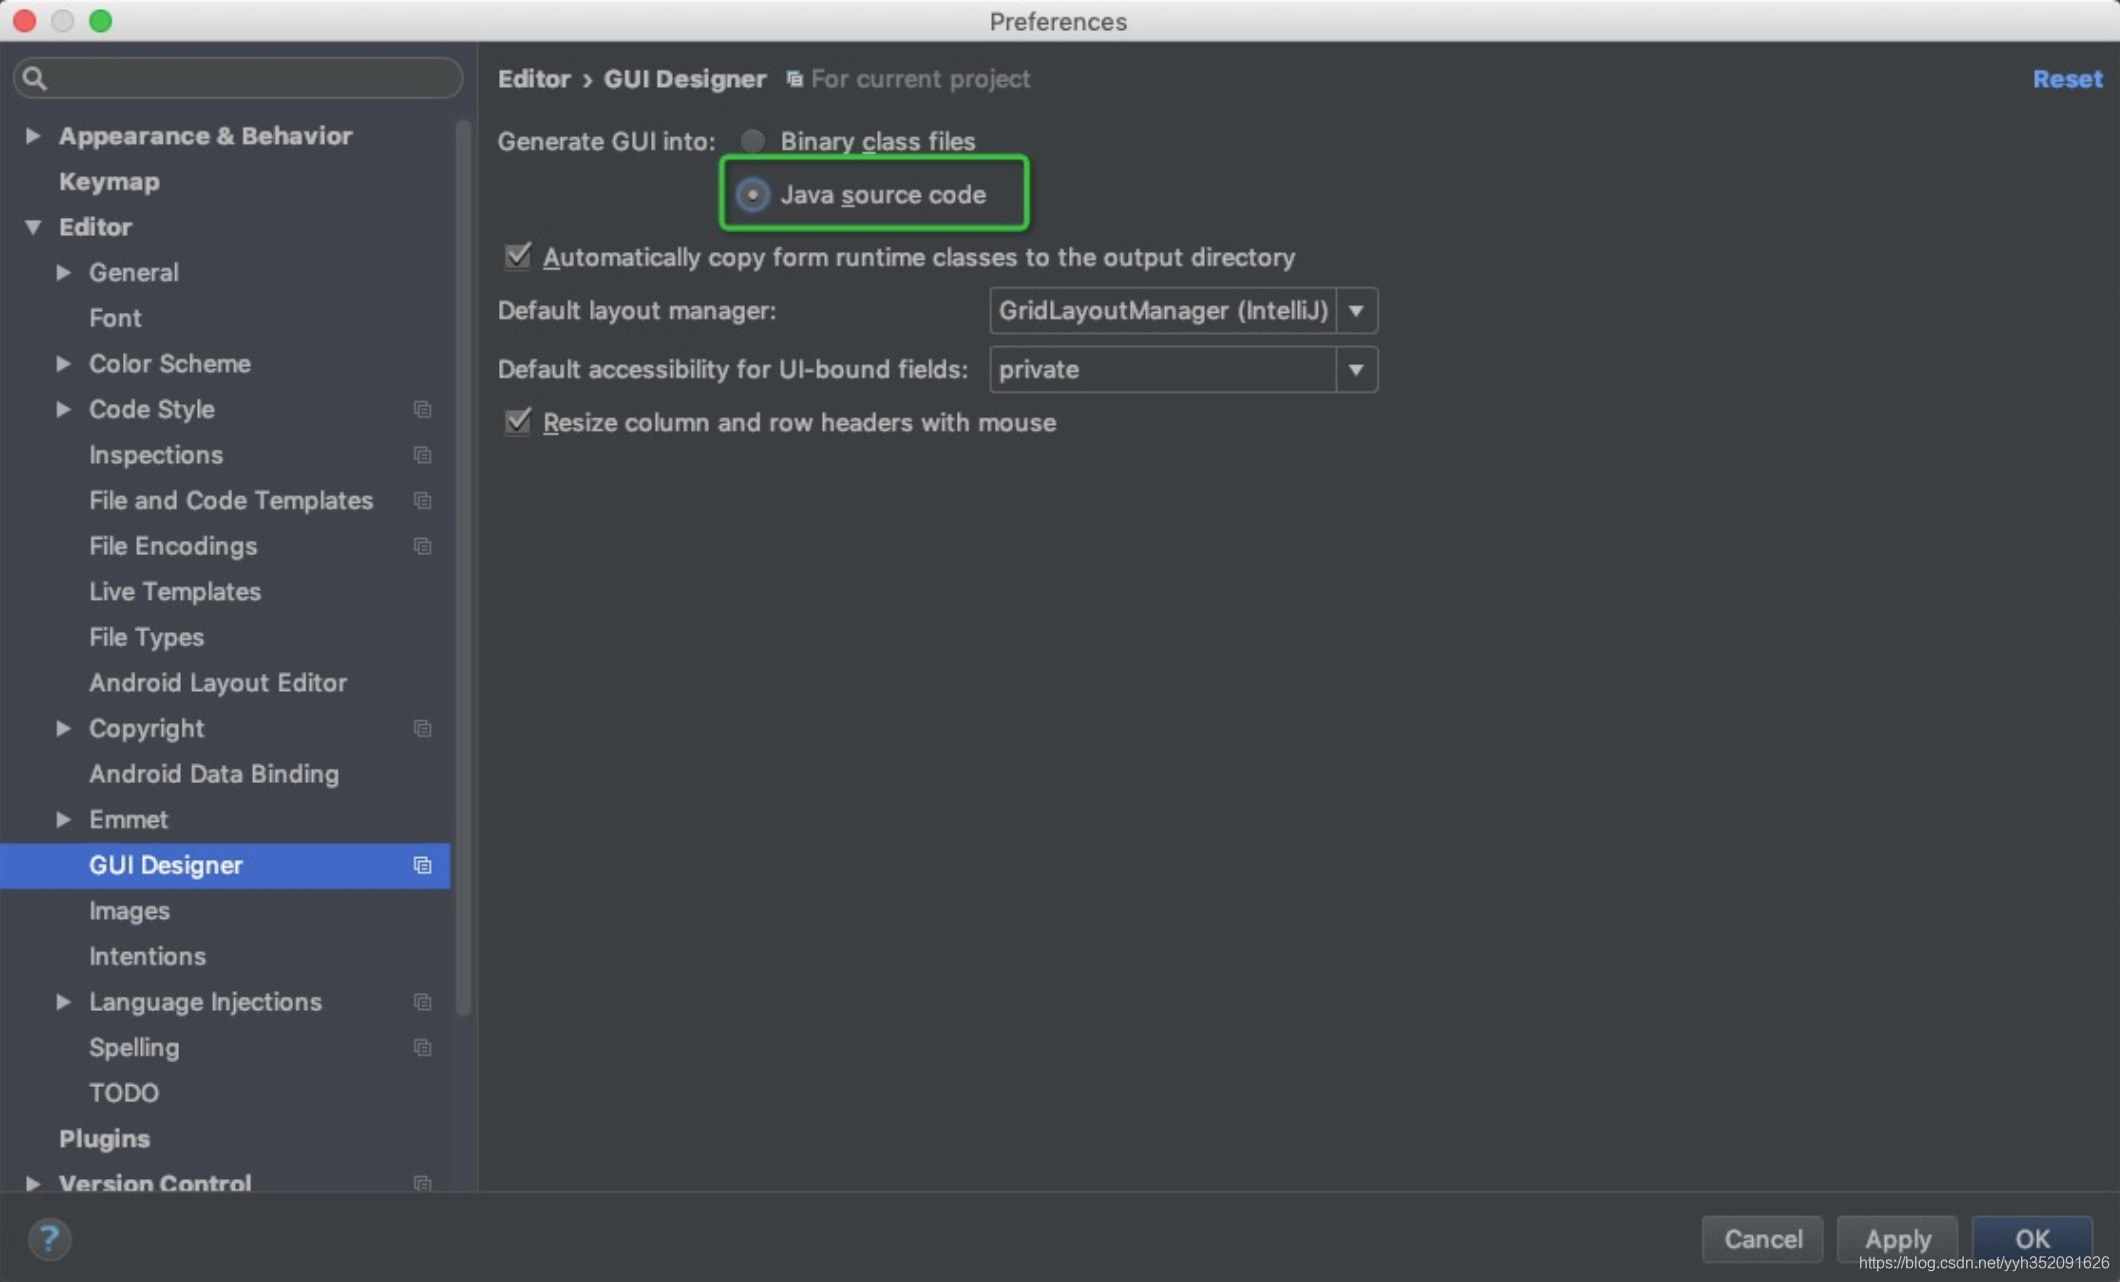
GUI 面板 IDEA - Preference - Editor - Gui Designer,勾选 Java Source Code,表示我们通过面板编辑后可以生成 java代码。
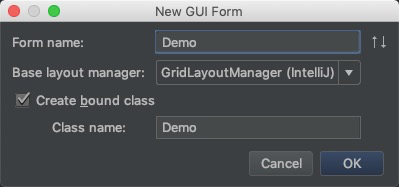
指定位置右击 - New - GUI Form
面板编辑完成之后,点击Toolbar工具条那里的
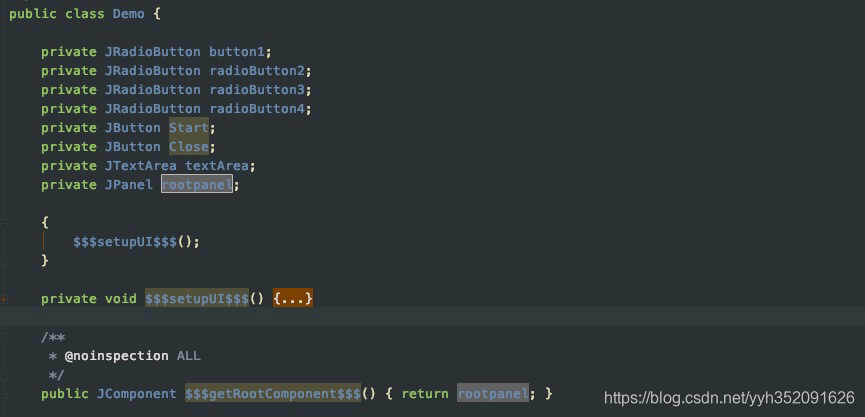
文件结构 默认根JPanel是没有配置 “field name”控件属性的,所以我们需要给他配置一下。
生成的java文件如图,$$$setupUI$$$() 方法里面是具体创建布局的代码。
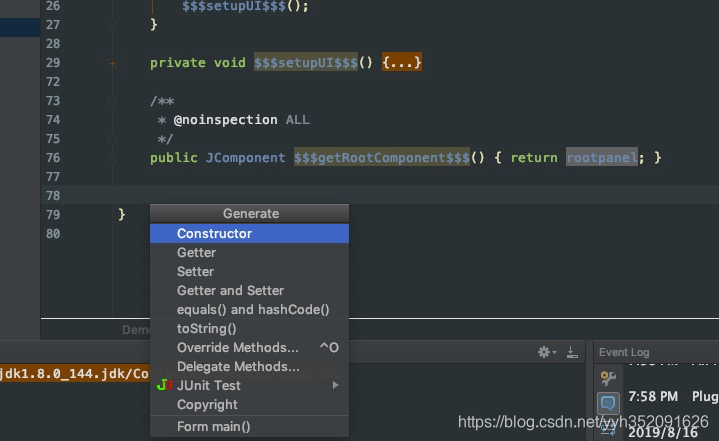
布局预览 在需要插入main方法的地方,按下 Command + n,点击 Form main,则会生成可执行的main方法。
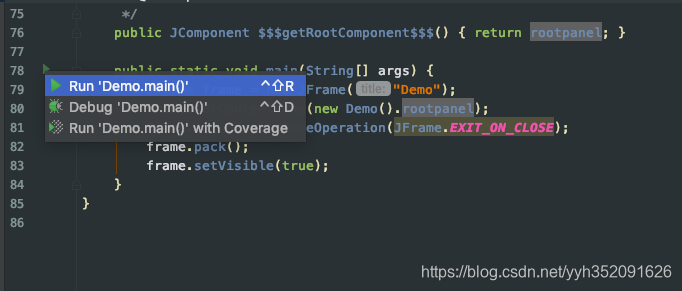
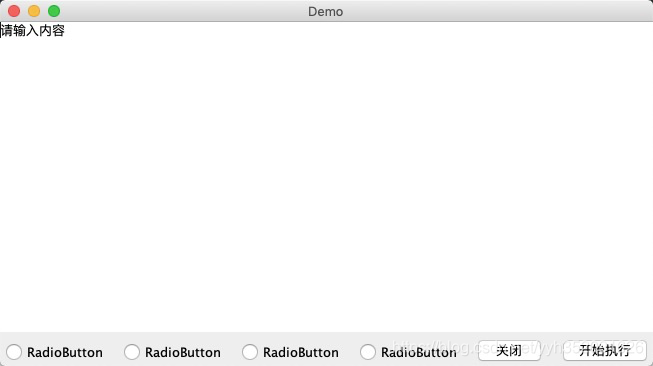
运行 main 方法,可以预览之前创建的布局。
插件上传 插件也支持上传到 idea 仓库,让其他人搜索到。http://www.jetbrains.org/intellij/sdk/docs/basics/getting_started/publishing_plugin.html
示例项目 实现反编译APK来查找是否引用了某个类;BundleFileFinder

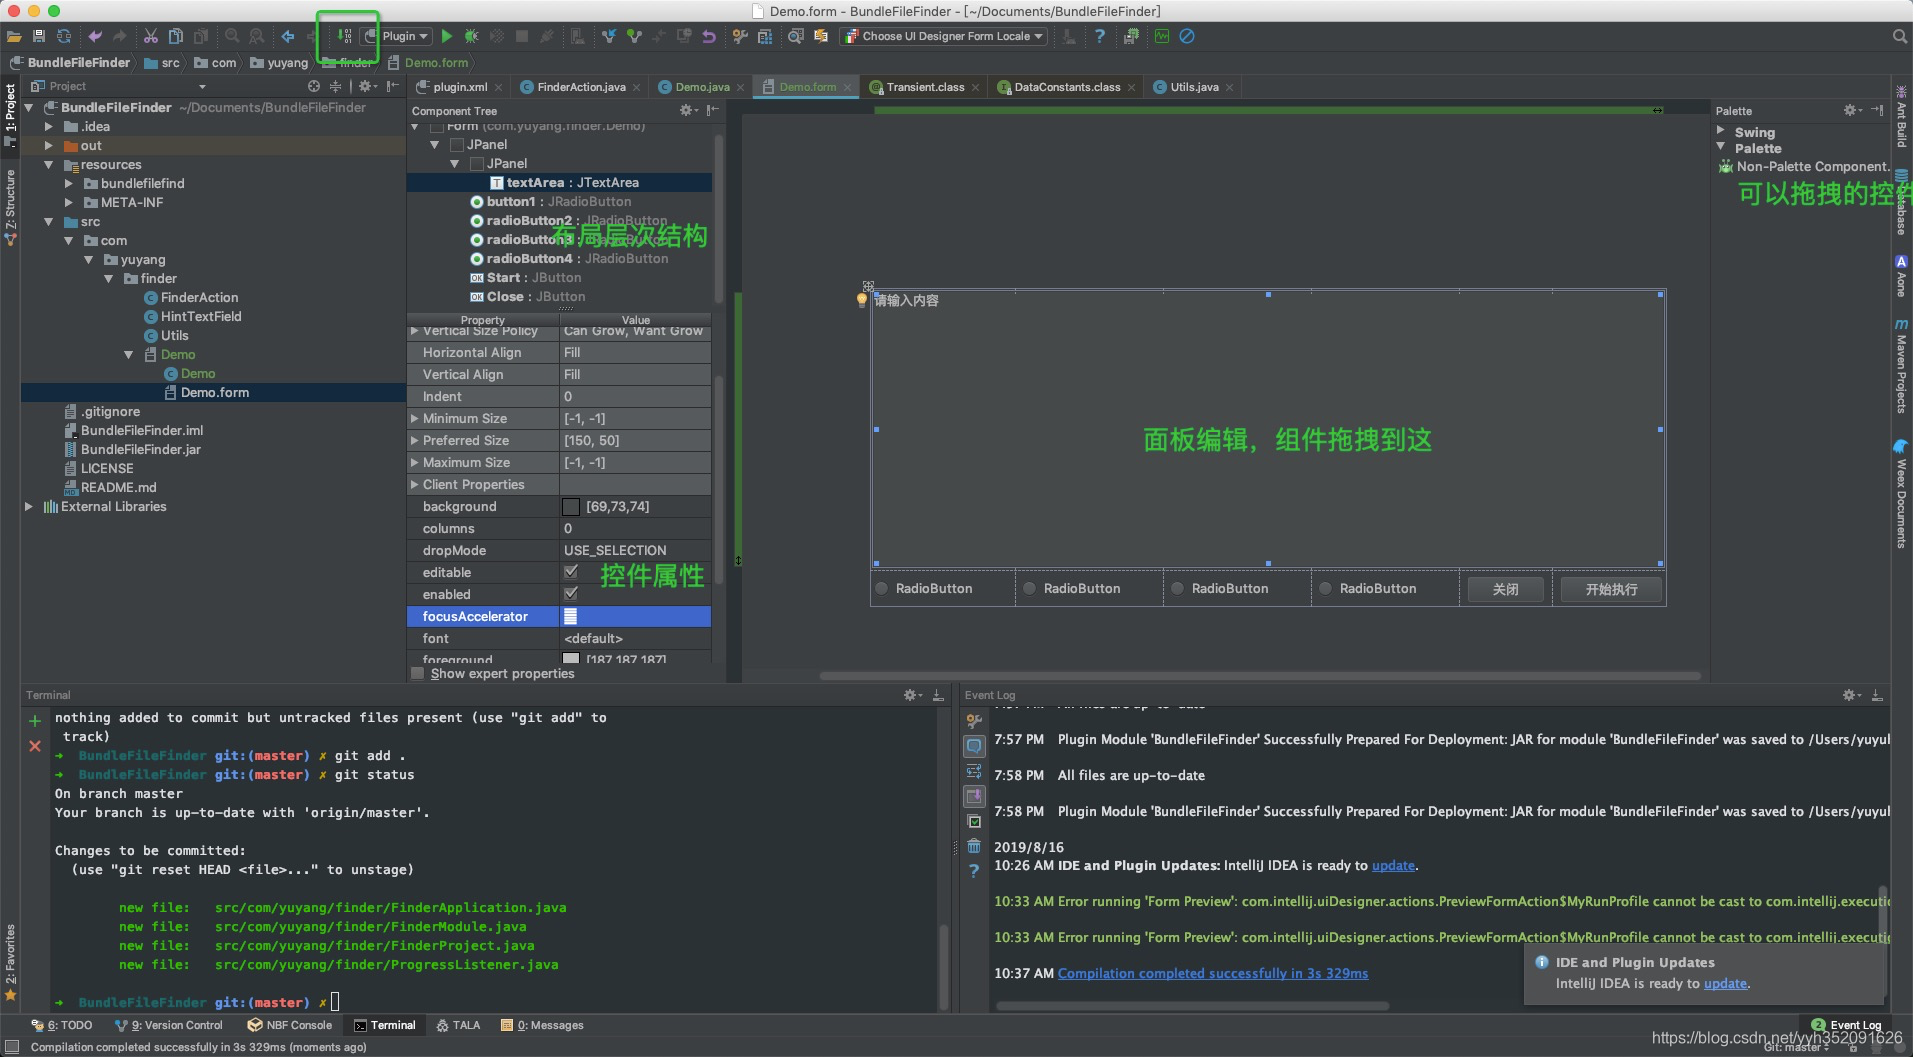
 按钮,进行编译。编译完成后,GUI的代码会生成在 对应的 Java文件里面。如图是 Demo.java