从源码的角度解析Handler、Looper、Message和MessageQueue

导语

虽然很基础的一个东西,然是最近面试中还是常常最被问到,而且都是到源码层,因此决定再造一次轮子!

作为一名Android程序猿,想必在最开始都碰到这么一个问题,就是在子线程中弹出一个 Toast,会抛出以下的异常:

1
2
3
4
5
6
7
java.lang.RuntimeException: Can't create handler inside thread that has not called Looper.prepare()
at android.os.Handler.<init>(Handler.java:121)
at android.widget.Toast$TN.<init>(Toast.java:322)
at android.widget.Toast.<init>(Toast.java:91)
at android.widget.Toast.makeText(Toast.java:238)
at com.example.testapp.MyActivity$MyAsyncTask.doInBackground(MyActivity.java:25)
at com.example.testapp.MyActivity$MyAsyncTask.doInBackground(MyActivity.java:21)

按传统的说法就是 Toast 只能在UI线程中显示,实际上不是的,应该是 Toast 只能在带有 Looper 的线程中显示。

另一个常见的场景,就是在子线程创建一个 Handler 也会抛出与上述一样的异常:

1
2
Java.lang.RuntimeException: Can't create handler inside thread that has not called Looper.prepare()
at android.os.Handler.<init>(Handler.java:121)

而在主线程为什么不会有该异常呢?这就是源码的东西了,在程序入口方法已经调用过以下代码,来创建一个主线程了:

1
2
3
4
5
6
Looper.prepareMainLooper();

ActivityThread thread = new ActivityThread();
thread.attach(false);

Looper.loop();

这个时候疑问就来了,什么是 Looper?

先来看一张图,初步了解一下 Handler、Looper、Message、MessageQueue 之间的关系

对于一个线程来说,Handler 允许发送和处理与该线程的 MessageQueue 相关联的 Message 或 Runnable 对象。每一个 Handler 实例与单个线程的 MessageQueue 相关联。

当我们创建一个 Handler 实例的时候,它将会绑定到当前所处的线程及其对应的消息队列,然后就是往消息队列里面传递消息或者 Runabble 对象,并在消息队列中取出消息来处理,或者取出 Runnable 对象进行执行!

Handler

Handler 作用

从本质上来讲,Handler 主要有以下两个作用

  • 调度消息和runnable对象去被执行,换句话说,就是在同一个线程中处理一些消息
  • 使得某个消息动作在不同线程中执行,也就是往其他线程的消息队列里插入消息

消息的调度主要有以下几种方式:

  • post(Runnable)
  • postAtTime(Runnable,long)
  • postDelayed(Runnable,long)
  • sendMessage(Message)
  • sendMessageAtTime(Message,long)
  • sendMessageDelayed(Message,long)
  • sendEmptyMessage(int)
  • sendEmptyMessageAtTime(int, long)
  • sendEmptyMessageDelayed(int, long)

最后实际上都是调用 sendEmptyMessageAtTime(Message,long) 方法

从上面的这些方法中可以看出:

  • post开头的几个方法,允许将 Runnable 对象插入到消息队列以便调用。
  • sendMessage 对应的几个方法,可以将 Message 插入到 MessageQueue,然后通过 Handler 的 handleMessage 方法来处理相应的消息。

Message

Message 结构

Message 类主要包含以下几个参数

1
2
3
4
5
6
7
8
9
public int what; // sendEmptyMessage 里面的 what,在 handleMessage 方法可以对不同的 Message.what 值做相应处理。

public Object obj; // Message 可以携带一个对象

Handler target; // 处理该消息的Handler

Message next;

Runnable callback; // 消息处理动作

1、从next参数可知,消息队列实际上是一个链表结构;

2、来看一下 Handler 的 dispatchMessage 方法:

1
2
3
4
5
6
7
8
9
10
11
12
13
14
15
/**
* Handle system messages here.
*/
public void dispatchMessage(Message msg) {
if (msg.callback != null) {
handleCallback(msg);
} else {
if (mCallback != null) {
if (mCallback.handleMessage(msg)) {
return;
}
}
handleMessage(msg);
}
}

从中我们可以知道,如果 Message 有定义 callback,那么消息处理会交由callback 去执行,否则,交由 Handler 的 handleMessage 去执行。

Message 创建及发送

一般发送一条消息,我们会调用一下代码:

1
handler.obtainMessage(int what, Object obj).sendToTarget();

那么,我们就简单分析一下消息创建的流程

1、Handler.obtainMessage

1
2
3
4
public final Message obtainMessage(int what, Object obj)
{
return Message.obtain(this, what, obj);
}

2、 Message.obtain 创建消息

1
2
3
4
5
6
7
8
public static Message obtain(Handler h, int what, Object obj) {
Message m = obtain();
m.target = h; // 指定了处理消息的Handler
m.what = what;
m.obj = obj;

return m;
}

3、 Message.sendToTarget 发送消息

1
2
3
public void sendToTarget() {
target.sendMessage(this); // 调用 Handler的sendMessage
}

4、Handler.sendMessage(Message) 发送消息,最后实际上是调用sendMessageAtTime方法,往MessageQueue里面插入一条消息

1
2
3
4
5
6
7
8
9
10
public boolean sendMessageAtTime(Message msg, long uptimeMillis) {
MessageQueue queue = mQueue;
if (queue == null) {
RuntimeException e = new RuntimeException(
this + " sendMessageAtTime() called with no mQueue");
Log.w("Looper", e.getMessage(), e);
return false;
}
return enqueueMessage(queue, msg, uptimeMillis);
}

至此,消息就发送完毕,也就是插入到了消息队列里面,接下来就是由消息队列处理了。

MessageQueue

MessageQueue 结构

1
2
3
4
5
6
7
8
9
private final boolean mQuitAllowed; // 是否允许MessageQueue退出;

private long mPtr; // MessageQueue 是通过调用 C++ native MessageQueue 实现的,这个 mPtr 就是指向 native MessageQueue;

Message mMessages; // 表示存储消息链表的 Head

private boolean mQuitting; // 当前MessageQueue是否正在终止;

private boolean mBlocked; // 表示next()方法调用是否被block在timeout不为0的pollOnce上;

MessageQueue 主要包含两个操作:插入和读取。读取操作本身会伴随着删除操作,插入和读取对应的方法分别是 enqueueMessage() 和 next()。

插入消息

1
2
3
4
5
6
7
8
9
10
11
12
13
14
15
16
17
18
19
20
21
22
23
24
25
26
27
28
29
30
31
32
33
34
35
36
37
38
39
40
41
42
43
44
45
46
47
48
49
50
51
52
53
54
boolean enqueueMessage(Message msg, long when) {
if (msg.target == null) {
throw new IllegalArgumentException("Message must have a target.");
}
if (msg.isInUse()) {
throw new IllegalStateException(msg + " This message is already in use.");
}

synchronized (this) {
if (mQuitting) {
IllegalStateException e = new IllegalStateException(
msg.target + " sending message to a Handler on a dead thread");
Log.w(TAG, e.getMessage(), e);
msg.recycle();
return false;
}

msg.markInUse();
msg.when = when;
Message p = mMessages;
boolean needWake;
// 插入到链表的头部,条件:链表为null或者当前消息的对应的触发时间比链表头的触发时间小,也就是比链表头早执行
if (p == null || when == 0 || when < p.when) {
// New head, wake up the event queue if blocked.
msg.next = p;
mMessages = msg;
needWake = mBlocked;
} else {
// 通过触发时间,将消息插入到队列中合适的位置
// 如果需要唤醒线程处理则调用C++中的nativeWake()函数.
needWake = mBlocked && p.target == null && msg.isAsynchronous();
Message prev;
for (;;) {
prev = p;
p = p.next;
if (p == null || when < p.when) {
break;
}
if (needWake && p.isAsynchronous()) {
needWake = false;
}
}
// 执行链表插入
msg.next = p;
prev.next = msg;
}

// We can assume mPtr != 0 because mQuitting is false.
if (needWake) {
nativeWake(mPtr);
}
}
return true;
}

读取消息

消息循环读取,是在 Looper.loop() 方法调用之后,最后来执行 MessageQueue.next() 方法,我们来看一下该方法:

1
2
3
4
5
6
7
8
9
10
11
12
13
14
15
16
17
18
19
20
21
22
23
24
25
26
27
28
29
30
31
32
33
34
35
36
37
38
39
40
41
42
43
44
45
46
47
48
49
50
51
52
53
54
55
56
57
58
59
60
61
62
63
64
65
66
67
68
69
70
71
72
73
74
75
76
77
78
79
80
81
82
83
84
85
86
87
88
89
90
91
92
93
94
95
96
97
98
99
100
101
102
103
104
105
106
Message next() {
// Return here if the message loop has already quit and been disposed.
// This can happen if the application tries to restart a looper after quit
// which is not supported.
final long ptr = mPtr;
if (ptr == 0) {
return null;
}

int pendingIdleHandlerCount = -1; // -1 only during first iteration
int nextPollTimeoutMillis = 0;
// 无限循环,往消息队列里面取消息
for (;;) {
if (nextPollTimeoutMillis != 0) {
Binder.flushPendingCommands();
}

nativePollOnce(ptr, nextPollTimeoutMillis);

synchronized (this) {
// Try to retrieve the next message. Return if found.
final long now = SystemClock.uptimeMillis();
Message prevMsg = null;
Message msg = mMessages;
if (msg != null && msg.target == null) {
// 过滤掉同步消息
do {
prevMsg = msg;
msg = msg.next;
} while (msg != null && !msg.isAsynchronous());
}
if (msg != null) {
if (now < msg.when) {
// 还未达到下一条消息的触发时间,为下一条待处理的消息设置就绪时间
nextPollTimeoutMillis = (int) Math.min(msg.when - now, Integer.MAX_VALUE);
} else {
// Got a message.
mBlocked = false;
if (prevMsg != null) {
prevMsg.next = msg.next;
} else {
mMessages = msg.next;
}
msg.next = null;
if (DEBUG) Log.v(TAG, "Returning message: " + msg);
msg.markInUse();
return msg;
}
} else {
// No more messages.
nextPollTimeoutMillis = -1;
}

// Process the quit message now that all pending messages have been handled.
if (mQuitting) {
dispose();
return null;
}

// If first time idle, then get the number of idlers to run.
// Idle handles only run if the queue is empty or if the first message
// in the queue (possibly a barrier) is due to be handled in the future.
if (pendingIdleHandlerCount < 0
&& (mMessages == null || now < mMessages.when)) {
pendingIdleHandlerCount = mIdleHandlers.size();
}
if (pendingIdleHandlerCount <= 0) {
// No idle handlers to run. Loop and wait some more.
mBlocked = true;
continue;
}

if (mPendingIdleHandlers == null) {
mPendingIdleHandlers = new IdleHandler[Math.max(pendingIdleHandlerCount, 4)];
}
mPendingIdleHandlers = mIdleHandlers.toArray(mPendingIdleHandlers);
}

// Run the idle handlers.
// We only ever reach this code block during the first iteration.
for (int i = 0; i < pendingIdleHandlerCount; i++) {
final IdleHandler idler = mPendingIdleHandlers[i];
mPendingIdleHandlers[i] = null; // release the reference to the handler

boolean keep = false;
try {
keep = idler.queueIdle();
} catch (Throwable t) {
Log.wtf(TAG, "IdleHandler threw exception", t);
}

if (!keep) {
synchronized (this) {
mIdleHandlers.remove(idler);
}
}
}

// Reset the idle handler count to 0 so we do not run them again.
pendingIdleHandlerCount = 0;

// While calling an idle handler, a new message could have been delivered
// so go back and look again for a pending message without waiting.
nextPollTimeoutMillis = 0;
}
}

通过上面源码可知:

首先会去判断handler是否为null,是的话就跳过所有的同步消息,查找到需要最先处理的异步消息。如果第一个待处理的消息还没有到要触发时间,则设置激活等待时间;否则这个消息就是需要处理的消息,将该消息设置为 inuse状态,并将队列设置为非 blocked 状态,然后返回该消息。

next() 方法是一个无限循环的方法,如果消息队列中没有消息,那么 next() 方法会一直阻塞,当有新消息到来时,next() 会将这条消息返回同时也将这条消息从链表中移除。

Looper

首先,在理解 Looper 之前,我们需要稍微了解一下 ThreadLocal 这个类。

ThreadLocal 是用于为每个线程创建一个单独的变量副本,提供了保持对象的方法和避免参数传递的复杂性。ThreadLocal 类有一个泛型参数,设置了保存到 ThreadLocal 容器中的数据类型。

实际上在 ThreadLocal 类中有一个静态内部类 ThreadLocalMap (其类似于Map),用键值对的形式存储每一个线程的变量副本,ThreadLocalMap 中元素的key为当前 ThreadLocal 对象,而value对应线程的变量副本,每个线程可能存在多个 ThreadLocal。

那么,在 Looper 中,也存储该着为每个线程单独创建的 ThreadLocal,里面保存着该线程对应的 Looper。

Looper 创建

我们来看一下 Looper.prepare() 方法:

1
2
3
4
5
6
7
8
9
10
11
12
13
14

static final ThreadLocal<Looper> sThreadLocal = new ThreadLocal<Looper>();

public static void prepare() {
prepare(true);
}

private static void prepare(boolean quitAllowed) {
if (sThreadLocal.get() != null) {
// 这也就意味着 prepare 方法,创建了当前线程的一个 Looper,并且每个线程 只能创建一次
throw new RuntimeException("Only one Looper may be created per thread");
}
sThreadLocal.set(new Looper(quitAllowed));
}

Looper 开启循环

来看一下 Looper.loop() 方法:

1
2
3
4
5
6
7
8
9
10
11
12
13
14
15
16
17
18
19
20
21
22
23
24
25
26
27
28
29
30
31
32
33
34
35
36
37
38
39
40
41
42
43
44
45
46
47
48
49
50
51
52
53
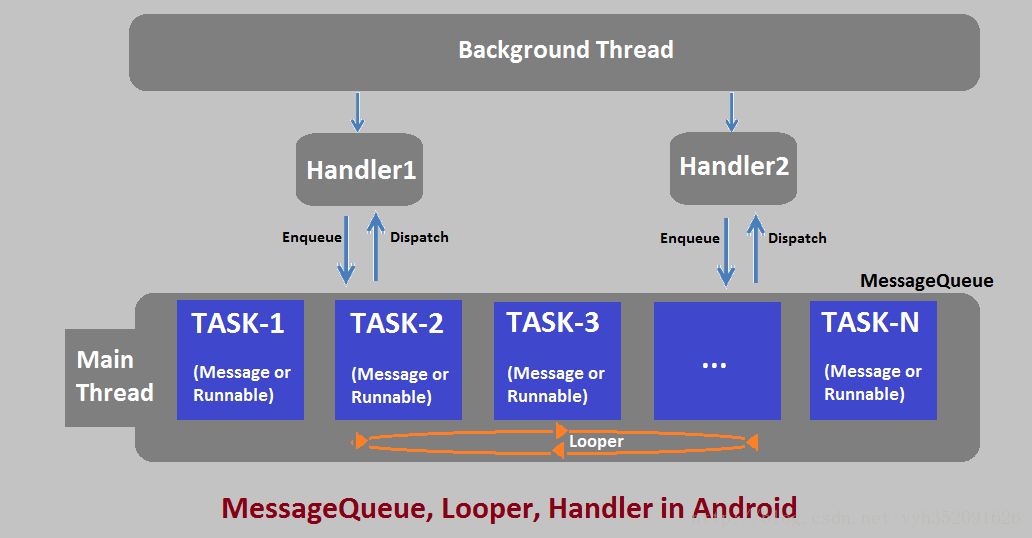
/**
* Run the message queue in this thread. Be sure to call
* {@link #quit()} to end the loop.
*/
public static void loop() {
// 进入当前线程的消息循环
final Looper me = myLooper();
if (me == null) {
throw new RuntimeException("No Looper; Looper.prepare() wasn't called on this thread.");
}
final MessageQueue queue = me.mQueue;

// Make sure the identity of this thread is that of the local process,
// and keep track of what that identity token actually is.
Binder.clearCallingIdentity();
final long ident = Binder.clearCallingIdentity();

for (;;) {
// 从队列中取出一条消息
Message msg = queue.next(); // might block
if (msg == null) {
// No message indicates that the message queue is quitting.
return;
}

// This must be in a local variable, in case a UI event sets the logger
final Printer logging = me.mLogging;
if (logging != null) {
logging.println(">>>>> Dispatching to " + msg.target + " " +
msg.callback + ": " + msg.what);
}

final long traceTag = me.mTraceTag;
if (traceTag != 0 && Trace.isTagEnabled(traceTag)) {
Trace.traceBegin(traceTag, msg.target.getTraceName(msg));
}
try {
// 分发消息给 Handler 处理
msg.target.dispatchMessage(msg);
} finally {
if (traceTag != 0) {
Trace.traceEnd(traceTag);
}
}

if (logging != null) {
logging.println("<<<<< Finished to " + msg.target + " " + msg.callback);
}

// 回收释放
msg.recycleUnchecked();
}
}

线程阻塞问题

细心的童鞋就会有个疑问,主线程对应的这个 Looper,在调用 Looper.loop() 方法之后,开启了无限死循环,那么为什么不会造成线程阻塞,导致 UI 动不了?

这个问题实际上就需要了解一下 Activity 的启动过程了。这里就不细说了,主要先了解一下 ActivityThread.H 这个类,它是继承于 Handler,我们可以看一下他的消息处理:

1
2
3
4
5
6
7
8
9
10
11
12
13
14
15
16
17
18
19
20
21
22
23
24
25
26
27
28
29
30
31
32
33
34
35
36
37
38
39
40
41
42
43
44
45
46
47
48
49
50
51
52
53
54
55
56
57
58
59
60
61
62
63
64
65
66
67
68
69
70
71
72
73
74
75
76
77
78
79
80
81
82
83
84
85
86
87
88
89
90
91
92
93
94
95
96
97
98
99
100
101
102
103
104
105
106
107
108
109
110
111
112
113
114
115
116
117
118
119
120
121
122
123
124
125
126
127
128
private final class H extends Handler {

public void handleMessage(Message msg) {
if (DEBUG_MESSAGES) Slog.v(TAG, ">>> handling: " + msg.what);
switch (msg.what) {
case LAUNCH_ACTIVITY: {
ActivityClientRecord r = (ActivityClientRecord)msg.obj;

r.packageInfo = getPackageInfoNoCheck(
r.activityInfo.applicationInfo);
handleLaunchActivity(r, null);
} break;
case RELAUNCH_ACTIVITY: {
ActivityClientRecord r = (ActivityClientRecord)msg.obj;
handleRelaunchActivity(r, msg.arg1);
} break;
case PAUSE_ACTIVITY:
handlePauseActivity((IBinder)msg.obj, false, msg.arg1 != 0, msg.arg2);
maybeSnapshot();
break;
case PAUSE_ACTIVITY_FINISHING:
handlePauseActivity((IBinder)msg.obj, true, msg.arg1 != 0, msg.arg2);
break;
case STOP_ACTIVITY_SHOW:
handleStopActivity((IBinder)msg.obj, true, msg.arg2);
break;
case STOP_ACTIVITY_HIDE:
handleStopActivity((IBinder)msg.obj, false, msg.arg2);
break;
case SHOW_WINDOW:
handleWindowVisibility((IBinder)msg.obj, true);
break;
case HIDE_WINDOW:
handleWindowVisibility((IBinder)msg.obj, false);
break;
case RESUME_ACTIVITY:
handleResumeActivity((IBinder)msg.obj, true,
msg.arg1 != 0);
break;
case SEND_RESULT:
handleSendResult((ResultData)msg.obj);
break;
case DESTROY_ACTIVITY:
handleDestroyActivity((IBinder)msg.obj, msg.arg1 != 0,
msg.arg2, false);
break;
case BIND_APPLICATION:
AppBindData data = (AppBindData)msg.obj;
handleBindApplication(data);
break;
case EXIT_APPLICATION:
if (mInitialApplication != null) {
mInitialApplication.onTerminate();
}
Looper.myLooper().quit();
break;
case NEW_INTENT:
handleNewIntent((NewIntentData)msg.obj);
break;
case RECEIVER:
handleReceiver((ReceiverData)msg.obj);
maybeSnapshot();
break;
case CREATE_SERVICE:
handleCreateService((CreateServiceData)msg.obj);
break;
case BIND_SERVICE:
handleBindService((BindServiceData)msg.obj);
break;
case UNBIND_SERVICE:
handleUnbindService((BindServiceData)msg.obj);
break;
case SERVICE_ARGS:
handleServiceArgs((ServiceArgsData)msg.obj);
break;
case STOP_SERVICE:
handleStopService((IBinder)msg.obj);
maybeSnapshot();
break;
case REQUEST_THUMBNAIL:
handleRequestThumbnail((IBinder)msg.obj);
break;
case CONFIGURATION_CHANGED:
handleConfigurationChanged((Configuration)msg.obj);
break;
case CLEAN_UP_CONTEXT:
ContextCleanupInfo cci = (ContextCleanupInfo)msg.obj;
cci.context.performFinalCleanup(cci.who, cci.what);
break;
case GC_WHEN_IDLE:
scheduleGcIdler();
break;
case DUMP_SERVICE:
handleDumpService((DumpServiceInfo)msg.obj);
break;
case LOW_MEMORY:
handleLowMemory();
break;
case ACTIVITY_CONFIGURATION_CHANGED:
handleActivityConfigurationChanged((IBinder)msg.obj);
break;
case PROFILER_CONTROL:
handleProfilerControl(msg.arg1 != 0, (ProfilerControlData)msg.obj);
break;
case CREATE_BACKUP_AGENT:
handleCreateBackupAgent((CreateBackupAgentData)msg.obj);
break;
case DESTROY_BACKUP_AGENT:
handleDestroyBackupAgent((CreateBackupAgentData)msg.obj);
break;
case SUICIDE:
Process.killProcess(Process.myPid());
break;
case REMOVE_PROVIDER:
completeRemoveProvider((IContentProvider)msg.obj);
break;
case ENABLE_JIT:
ensureJitEnabled();
break;
case DISPATCH_PACKAGE_BROADCAST:
handleDispatchPackageBroadcast(msg.arg1, (String[])msg.obj);
break;
case SCHEDULE_CRASH:
throw new RemoteServiceException((String)msg.obj);
}
if (DEBUG_MESSAGES) Slog.v(TAG, "<<< done: " + msg.what);
}
}

那么,对于创建一个Service来说,我们看一下 ApplicationThread 的调度:

1
2
3
4
5
6
7
8
9
10
11
public final void scheduleCreateService(IBinder token,
ServiceInfo info, CompatibilityInfo compatInfo, int processState) {
updateProcessState(processState, false);
CreateServiceData s = new CreateServiceData();
s.token = token;
s.info = info;
s.compatInfo = compatInfo;

// 发送创建 Service 的消息
sendMessage(H.CREATE_SERVICE, s);
}

不难看出,实际上创建 ```Service、包括执行其生命周期,最后都是交由 ActivityThread.H 处理,包括 Activity 的生命周期,也是一样,所以 Looper 虽然死循环,但是本质上我们UI的展示、更新,也是通过 Handler 来处理了,所以并不会造成真正的UI阻塞。

所以,简单来讲,ActivityThread 实际上就是开启了一个消息循环,来执行 Activity、Service 等等的相关操作,一旦这个消息循环停止了,则意味着App进程也结束了。

但是,如果 handlerMessage 是在主线程执行,其处理尽可能不要执行耗时操作,避免UI卡顿或发生 ANR。

结语

最后,再回过头去看看前文中的那张图,相信你就能基本理解了!

感谢阅读!